I've been swamped with work lately, so forgive the lack of posts! I was hoping / thought I had posted at least once last month, but with reading week blues and formal labs to hand in, I just didn't get the time.
I've haven't been busy, but my mind has. I've decided I will (eventually!) build my own tank. I feel as though I'll make a ball python habitat first and work from there. It would be a fair-sized build, but not the biggest I'd like to do.
It's not the first time I've thought about, but it is the first time I've actually looked into products, made plans, and generally put more than an evening's worth of thought into it. I'll post my plans in the days to come, as it's a little late tonight to start playing around with SketchUp. I've fleshed them out in 3D, so I can get a real feel for the size.
Looking into some materials, I've come to the conclusion that I will be spending approximately 300.00$ on this, and that's without actually calculating how much wood I'll need, or the price of sliding glass doors. Everything looks like it costs relatively little, but it adds up so fast!
I'll need screening, ventilation, locks, hinges, doors, and wood, not tomention any coating I want to apply for protection and finish. Plus tools.
Maybe more like 500.00$, but it will be nice, sturdy and able to hold temperature. I'll be quite happy with it. I won't pick on anyone in particular, but some of the ideas I saw online looked really cheaply done. My tanks are as much an esthetic part of my environment as they are a self-contained habitat for my animals. I also believe anything worth doing is worth overdoing.
I'm also looking into what kind of product I should use. Right now, I'm basically designing a box that can act as a piece of durable furniture as well! I am hoping to be able to stack it one day, so I want to make sure the weight will be supported.
In the meanwhile, some nice examples of custom built habitats can be seen from Vivexotics.
Thursday, March 14, 2013
Friday, January 18, 2013
Future Aquisitions (part 2)
So over the last couple posts, I've mentioned that I'm now looking into another possible creature to bring into the fold. I came a cross one while at Stacey's, getting crickets. I even got to touch it, hold it, let it check out my arm. It climbed right up to my shoulder before the girl took it back and replaced it in its tank. This creature, steeped in myth, legend, and fear, carries the name "royal", for it was rumoured to be ever at the wrist of Cleopatra.
I'm talking about Python regius, the royal python, or ball python as it's commonly called.
These snakes are one of the most, if not the most, popular pet snake across North America. They're very even-tempered, docile, and easily handled. They also grow to respectable, yet manageable length (about 3 feet for males and 5 feet for females) and can live several decades. Their diets aren't overly pricey, only requiring a feeding every week, or other week once fully grown. They also have some very attractive morphs, varying from browns, to yellows to whites.
The snake I got to play with was a youngling, only about a foot and a half long. This was the first time I've actually held a snake on my own and it was amazing. You can really feel the power in it, like a great spring, ready to strike. But I also get the feeling that it was totally safe with it in my hand, and on my arm. I can really say that I respect this animal for being something much more than just an attractive creature; it's a predator. I was informed by the girl at Stacey's (going to have to learn her name) that they don't require as much room as some people would think, if you are the type of person to let it out of the tank often enough. That's not to say some caring, passionate people don't go all out on their pythons. I would honestly like to have a setup of about five feet long by three or four feet up; these snakes are terrestrial, but do like climbing up in the lower branches from time to time.
After doing some research, I notice that most people (at least those that post to the internet) use the sterile type setup for ease of cleaning and maintenance. Well, that's just not my style. I've seen some really nice naturalistic setups, and I feel I would be okay with that. But what I would really like is to try and reproduce some of the natural habitat of Ghana and Nigeria, which is the native homeland of the the royal. I've seen some nice setups, but I'm not blinded to the fact that natural setups can engender health risks, like moulds, parasites, and the like. However, if you take the time and build up a more natural ecosystem, the risks are minimized, and I feel like that's what I would really like to do. My experience with natural versus artificial is definitely leaning in favour of the natural.
The setup itself is straightforward; two hides, a heat source, a light source, a watering source big enough to soak in, a dry substrate, and as much enrichment as you can provide, as well as all the little bits and bobs that come with tanks.
 This simple diagram came from The Doctors Foster and Smith pet care site (linked to right here). It shows all the basic needs for your python. The tank sounds fairly easy to control, and certainly no more difficult than a crested gecko. From what I've gathered so far, I could use a similar mix of substrate as the one I mixed for my tropical terrarium, with maybe some sand in place of the tree fern; something to make it a little more arid than what I currently use it for. The girl at Stacey's does caution that these inquisitive explorers are escape artists and to watch for any possible way out of the enclosure. I like the idea of the wading pool. It will definitely make controlling humidity less of a critical task. Any additional moisture can be taken at the snake's leisure. Time to break out the foam and grout; we're making a pool! Well, one day.
When I see the variety of morphs out there, even though they're all nice, it's clear in my mind which one I prefer; original. Or at least, the deep, earthy browns that look like polished wood. The white and yellow morphs are okay, but I can't see the desire to keep a stark white snake when you could keep one that looks like a piece of living, varnished driftwood. Gorgeous. All the pics I've thus far posted reflect my particular tastes. Oh! And best of all, what with the popularity of this snake, pretty much all the one found locally are Canadian-bred. I would definitely look into a breeder though. From what I've seen, your animal will get the better care at a breeder than a store, which makes sense. Breeders are usually well experienced in what they breed. I found a breeder in Ottawa (a list actually) and I would love to visit some facilities and see what they have to offer.
I could go on and on about this species, like how they're revered as earth spirits in their native homeland, and seen as good omens and all sorts of stuff, but I'll just cut it off here. Next post, I'm thinking I need to start looking into actual construction. I'm getting less and less impressed with commercial terrariums as a whole.
I'm talking about Python regius, the royal python, or ball python as it's commonly called.
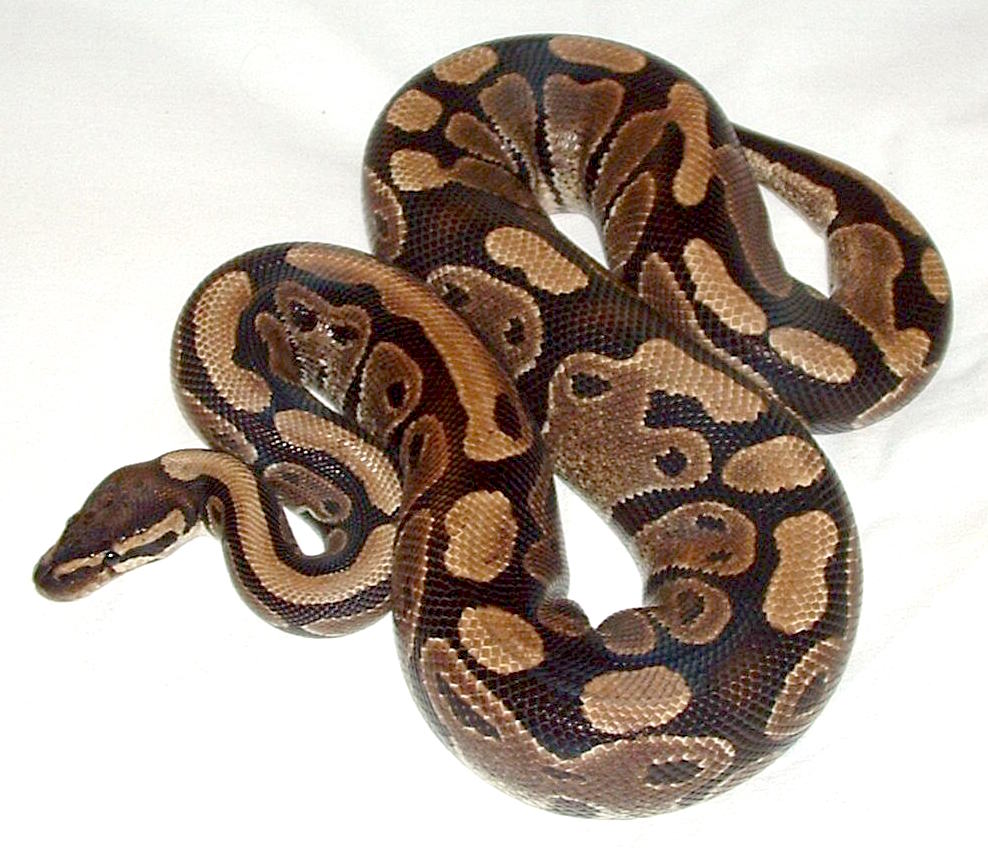 |
| Image from Wikipedia |
The snake I got to play with was a youngling, only about a foot and a half long. This was the first time I've actually held a snake on my own and it was amazing. You can really feel the power in it, like a great spring, ready to strike. But I also get the feeling that it was totally safe with it in my hand, and on my arm. I can really say that I respect this animal for being something much more than just an attractive creature; it's a predator. I was informed by the girl at Stacey's (going to have to learn her name) that they don't require as much room as some people would think, if you are the type of person to let it out of the tank often enough. That's not to say some caring, passionate people don't go all out on their pythons. I would honestly like to have a setup of about five feet long by three or four feet up; these snakes are terrestrial, but do like climbing up in the lower branches from time to time.
| Image from Amuzani's forumpost on http://www.albertareptilesociety.org |
The setup itself is straightforward; two hides, a heat source, a light source, a watering source big enough to soak in, a dry substrate, and as much enrichment as you can provide, as well as all the little bits and bobs that come with tanks.
 |
| Image from http://www.pet-care-portal.com |
I could go on and on about this species, like how they're revered as earth spirits in their native homeland, and seen as good omens and all sorts of stuff, but I'll just cut it off here. Next post, I'm thinking I need to start looking into actual construction. I'm getting less and less impressed with commercial terrariums as a whole.
Tuesday, January 15, 2013
Leopard Gecko Build (part 4)
After reviewing my third post on the leo build, I realize I never got around to talking tech about the methods and materials used for the foam rock cave.
Therefore, as promised, methods and material review for my rock cave!
Materials
My best advice here is to keep searching until you have exactly what you want. I spent weeks trying to find Modge-Podge, finally settling for Liquitex, a similar product. Ironically, I later found Modge-Podge at Wall-mart for half the price. Now, I have to say, however, that the Liquitex seems to have worked really well. It was the least toxic substance I could find, it was the right finish, and it is resistant to moisture.
For the paint, all I did was dig through some old (really old) arts and crafts boxes in the basement and found a decent pallet of naturalistic rock colours. I based my pallet choice on some of the rocks I've collected to use in future tanks; rocks found along the shoreline, in fields, etc. Rocks are one of the few things I prefer to find outside than actually buy. They aren't porous (obviously) so they're easy to disinfect and use. Sorry, side-bar. This is one of the parts of the build that might require a bit of an artistic background. I've been taught colour selection and identification since I was young, so it's all fairly second nature to me. Luckily for everyone, the rules of art are somewhat flexible. And by that, of course, I mean it's all up to you. It all comes down to what you're able to achieve. Choose colours that reflect the type of habitat you want to create for your animals. For this build, as I recall, I used the following colours; a creamy white, a deep blue, a dark grey, a mocha brown, and bit of black.
Lastly, the right tools for the right job. I'm lucky enough to have a plethora of brushes both new and old kicking around. I used just one brush for the majority of the painting, one sponge brush for the sealant, and one fine brush for the cave painting details. I originally wanted to use a spray-bottle to apply the sealant, but Liquitex specifies not to mix with water, which would have been necessary to reduce its consistency. The sponge brush work fairly well, leaving a nice pitted texture, which I found worked better than the unnatural strokes of a course brush.
Methodes
The best way I can describe how to get a natural rocky look is to just dump on the paint. Don't mix it on the pallet, mix on the canvas (the rock). This makes for a blotchy, heterogenous mix of colours which looks much more natural than straight lines of different, solid colours. Another tip is just that, the tip. Use the tip of the brush and... just... tap it on. Hard to explain. Let the bristles give the rock that "sprayed on" look like that of centuries of mud and weather working on the stone. Once you've got a nice mix of colours, don't over work it! This will blend the colours and ruin that natural texture you've jsut spent fifteen minutes getting!
Also, don't feel rushed, but if you can establish a base over the entire build while the initial coat is still wet, you'll have a much easier time mixing the colours up just the way you want them. If, by chance, you want a dusty look, try a little dry brush action, which I won't get into detail here. I'll leave that up to the much artsier people of the internet.
You want to see the third phase of the leo tank? Yeah you do.


For anyone who's followed the progression of my leo tank, much change can be observed. Chief among them, the substrate. Although the use of sand makes me leery, this is not your run of the mill sand. It's Zoo-Med's Excavator Clay Burrowing Substrate. Before I launch into it, I have to mention the following:
This is a clay-based substrate; there IS a risk of impaction.
Having said that, here's why I still chose to use it.
First of all, the clay is a great base to hold all the driftwood and stones in place, and it makes for great hills and depressions. It also holds heat far better than the Eco-Carpet. It's also more natural and visually appealing, though by no means should you compromise functionality for looks. This clay sand compacts nicely and forms a fairly solid base. It's much harder to accidentally ingest this than regular sand. Also, in my case, the crickets usually make for the dark "safety" of the cave. As such, the cave still makes use of the Eco-Carpet, for exactly that reason. It becomes the feeding ground for crickets. Another designated feeding area is the large flat stone I sunk into the clay sand just outside of the cave. So far, it's been great.
The clay is made of sculpt burrows and tunnels, but I've heard tales of the tunnels collapsing, most likely due to poor construction. I didn't even try this, for exactly that reason; I didn't want to risk having a tunnel collapse on my leo.
The overall result has so far been pretty good. The cave, thanks to the new Heat Wave Desert under-mounted tank by Exo-Terra, I'm holding a pretty cozy temperature inside the cave. I haven't yet been able to buy the thermometer I've been eying to get an exact reading, but it's certainly around 30 °C. Bronka spends most of his time basking half inside the cave, half outside, sleeping right under the heat lamp. I put not a small amount of thought into the layout of this setup; the cave is both the first and second floor of a three-storey "bungalow", the third being the old piece of driftwood I've been using since I first got him. This layout effectively creates a sort of Rete's stack, despite the fact that it's far warmer at the bottom. The new piece, clearly visible on the right, was a great find! It's hollow, making for a very cozy natural hide out of the direct light. I will be placing moist moss in it soon enough, finally providing the two natural hides he should have; cool and warm, dry and moist. I've seen him out exploring much more since he's moved in. I truly thinks he enjoys it! The front door access has made picking him out ofthe tank much easier, allowing me to handle him much more than before!
Although I could fit a couple extra furnishings, I think I'll limit myself another rock or two, just to minimize the overall amount of open sand, effectively reducing risk of ingestion. He has a lot to climb on as it is, and I think he appreciates the wide open spaces he now has as well.
Coming up in the next post, I'll talk about the creature I'm really working on acquiring, and possibly revisit some of my previous product reviews.
Therefore, as promised, methods and material review for my rock cave!
Materials
My best advice here is to keep searching until you have exactly what you want. I spent weeks trying to find Modge-Podge, finally settling for Liquitex, a similar product. Ironically, I later found Modge-Podge at Wall-mart for half the price. Now, I have to say, however, that the Liquitex seems to have worked really well. It was the least toxic substance I could find, it was the right finish, and it is resistant to moisture.
For the paint, all I did was dig through some old (really old) arts and crafts boxes in the basement and found a decent pallet of naturalistic rock colours. I based my pallet choice on some of the rocks I've collected to use in future tanks; rocks found along the shoreline, in fields, etc. Rocks are one of the few things I prefer to find outside than actually buy. They aren't porous (obviously) so they're easy to disinfect and use. Sorry, side-bar. This is one of the parts of the build that might require a bit of an artistic background. I've been taught colour selection and identification since I was young, so it's all fairly second nature to me. Luckily for everyone, the rules of art are somewhat flexible. And by that, of course, I mean it's all up to you. It all comes down to what you're able to achieve. Choose colours that reflect the type of habitat you want to create for your animals. For this build, as I recall, I used the following colours; a creamy white, a deep blue, a dark grey, a mocha brown, and bit of black.
Lastly, the right tools for the right job. I'm lucky enough to have a plethora of brushes both new and old kicking around. I used just one brush for the majority of the painting, one sponge brush for the sealant, and one fine brush for the cave painting details. I originally wanted to use a spray-bottle to apply the sealant, but Liquitex specifies not to mix with water, which would have been necessary to reduce its consistency. The sponge brush work fairly well, leaving a nice pitted texture, which I found worked better than the unnatural strokes of a course brush.
Methodes
The best way I can describe how to get a natural rocky look is to just dump on the paint. Don't mix it on the pallet, mix on the canvas (the rock). This makes for a blotchy, heterogenous mix of colours which looks much more natural than straight lines of different, solid colours. Another tip is just that, the tip. Use the tip of the brush and... just... tap it on. Hard to explain. Let the bristles give the rock that "sprayed on" look like that of centuries of mud and weather working on the stone. Once you've got a nice mix of colours, don't over work it! This will blend the colours and ruin that natural texture you've jsut spent fifteen minutes getting!
Also, don't feel rushed, but if you can establish a base over the entire build while the initial coat is still wet, you'll have a much easier time mixing the colours up just the way you want them. If, by chance, you want a dusty look, try a little dry brush action, which I won't get into detail here. I'll leave that up to the much artsier people of the internet.
You want to see the third phase of the leo tank? Yeah you do.


For anyone who's followed the progression of my leo tank, much change can be observed. Chief among them, the substrate. Although the use of sand makes me leery, this is not your run of the mill sand. It's Zoo-Med's Excavator Clay Burrowing Substrate. Before I launch into it, I have to mention the following:
This is a clay-based substrate; there IS a risk of impaction.
Having said that, here's why I still chose to use it.
First of all, the clay is a great base to hold all the driftwood and stones in place, and it makes for great hills and depressions. It also holds heat far better than the Eco-Carpet. It's also more natural and visually appealing, though by no means should you compromise functionality for looks. This clay sand compacts nicely and forms a fairly solid base. It's much harder to accidentally ingest this than regular sand. Also, in my case, the crickets usually make for the dark "safety" of the cave. As such, the cave still makes use of the Eco-Carpet, for exactly that reason. It becomes the feeding ground for crickets. Another designated feeding area is the large flat stone I sunk into the clay sand just outside of the cave. So far, it's been great.
The clay is made of sculpt burrows and tunnels, but I've heard tales of the tunnels collapsing, most likely due to poor construction. I didn't even try this, for exactly that reason; I didn't want to risk having a tunnel collapse on my leo.
The overall result has so far been pretty good. The cave, thanks to the new Heat Wave Desert under-mounted tank by Exo-Terra, I'm holding a pretty cozy temperature inside the cave. I haven't yet been able to buy the thermometer I've been eying to get an exact reading, but it's certainly around 30 °C. Bronka spends most of his time basking half inside the cave, half outside, sleeping right under the heat lamp. I put not a small amount of thought into the layout of this setup; the cave is both the first and second floor of a three-storey "bungalow", the third being the old piece of driftwood I've been using since I first got him. This layout effectively creates a sort of Rete's stack, despite the fact that it's far warmer at the bottom. The new piece, clearly visible on the right, was a great find! It's hollow, making for a very cozy natural hide out of the direct light. I will be placing moist moss in it soon enough, finally providing the two natural hides he should have; cool and warm, dry and moist. I've seen him out exploring much more since he's moved in. I truly thinks he enjoys it! The front door access has made picking him out ofthe tank much easier, allowing me to handle him much more than before!
Although I could fit a couple extra furnishings, I think I'll limit myself another rock or two, just to minimize the overall amount of open sand, effectively reducing risk of ingestion. He has a lot to climb on as it is, and I think he appreciates the wide open spaces he now has as well.
***
Coming up in the next post, I'll talk about the creature I'm really working on acquiring, and possibly revisit some of my previous product reviews.
Monday, January 14, 2013
Tropical Terrarium Build (part 2)
First, a little catching up after the holidays!
Regrettably, my moss project didn't go so well. I think it was due to a poor mixture and lack of sufficient natural lighting. I think I'll give it another try in the spring, after the melt, when the moss will be accessible. This time, I'll give the beer recipe a try. Or maybe even both yogurt and beer, for a comparative analysis.
I've also got a bunch of new pics to put up! Lots of new things in both my leo's habitat and my tropical terrarium. My leo's build has been completely upgraded, tank and all. For Christmas, I got the Exo-Terra Medium Low terrarium; much nicer than an old aquarium! I'll get into that on a different post.
For now, I'll showcase my tropical terrarium.

Behold, the final product of my tropical build!
It's not quite what I had envisioned, but I'm satisfied with it. I was obviously hoping for a little moss in there, but I may yet be able to culture some and transplant it. In the meanwhile, I bought some Zilla Premium Compressed Frog Moss to toss around for a little extra splash of green. I'm glad I didn't try to stick it down; it works much better just fluffed about. The colour can be a little dominating if I put too much of it in one spot.
Also note that my plants have been trimmed down and separated. I mixed up my pothos a little, so I hope that they won't be in direct competition for root space. The gold pothos (just visible on the right) is doing fine. It's sprouted a couple new leaves in the time since it's planting, meaning that it is doing well.
I was having some trouble with the philodendron and sansevieria (snake plant), however. When I put the Zoo-Med Hydroballs in, I oversaturated the soil. This lead to me loosing a couple philodendron leaves and a sansevieria stalk to overwatering. Still, being fairly hardy plants, they've totally bounced back. The philodendron has also sprouted two new leaf, which are not visible in the above image. Some of the individual pothos plants are withering off, but some have also sprouted new growths, kind of averaging it out. The sansevieria is now my cresty's favourite resting spot. He wedges himself between the leaves, almost completely concealed. I wish he'd take advantage of the log hideout I built him, but I'm just glad he's enjoying the plants.
I've still got to install the Monsoon system from my old tank, although for now, my hand mister is doing fine. As a side bar, I'll most likely be revisiting my review of the Monsoon system eventually, as I've had some issues with it since. One of the tubes is also in need of a little patch job. A drop or two of silicone should solve the issue.
In later pics, you'll see the substrate layers; drainage, mesh, and substrate layer. The substrate is a combination of three Exo-Terra products: Exo-Terra Jungle Earth, Exo-Terra Tree Fern Substrate, and Exo-Terra Plantation Soil (brick format). The mixture I used is as follows:
-2 parts plantation soil
-1 part tree fern substrate
-1 part forest soil
This gives me a really nice, fairly natural substrate that is both visually appealing and thus far totally functional. Plenty of drainage and a good amount of water retention.
I've also added a couple extra pieces of wood, drift wood and grapewood. I originally planned to use them for the leo tank, but once again, my eyes are bigger than the physical space of my tanks. It's all worked out though, since they fit perfectly into the tropical tank. They give even more jumping and climbing platforms, and help to break the line of sight.
The overall effect has been fairly noticeable. Humidity has been stable at the 50 to 70 percent range, and temperature has been holding at 20 to 25°C.
Psycological effects have been noted as well. Rocza's a little less intimidated by my presence, he eats more freely from my fingers, he's actually walked up to the glass and observed me, and he's gone as far as jumping at my fingers as I worked to place some wires around the outside of his tank. I'm fairly sure it was the twiddling movements that set him off. I placed my hand in right after and he recognized it at once, and tryed to lick Repashy off my fingers.
But enough analysis, time for some more pictures!


Next post, I'll show off the third phase of the leopard gecko build, talk about some new product I'm trying out, do a little research into yet another animal I'd like to acquire, and post plenty new pictures. Hopefully, it won't be another month till then!
Regrettably, my moss project didn't go so well. I think it was due to a poor mixture and lack of sufficient natural lighting. I think I'll give it another try in the spring, after the melt, when the moss will be accessible. This time, I'll give the beer recipe a try. Or maybe even both yogurt and beer, for a comparative analysis.
I've also got a bunch of new pics to put up! Lots of new things in both my leo's habitat and my tropical terrarium. My leo's build has been completely upgraded, tank and all. For Christmas, I got the Exo-Terra Medium Low terrarium; much nicer than an old aquarium! I'll get into that on a different post.
For now, I'll showcase my tropical terrarium.
***

Behold, the final product of my tropical build!
It's not quite what I had envisioned, but I'm satisfied with it. I was obviously hoping for a little moss in there, but I may yet be able to culture some and transplant it. In the meanwhile, I bought some Zilla Premium Compressed Frog Moss to toss around for a little extra splash of green. I'm glad I didn't try to stick it down; it works much better just fluffed about. The colour can be a little dominating if I put too much of it in one spot.
Also note that my plants have been trimmed down and separated. I mixed up my pothos a little, so I hope that they won't be in direct competition for root space. The gold pothos (just visible on the right) is doing fine. It's sprouted a couple new leaves in the time since it's planting, meaning that it is doing well.
I was having some trouble with the philodendron and sansevieria (snake plant), however. When I put the Zoo-Med Hydroballs in, I oversaturated the soil. This lead to me loosing a couple philodendron leaves and a sansevieria stalk to overwatering. Still, being fairly hardy plants, they've totally bounced back. The philodendron has also sprouted two new leaf, which are not visible in the above image. Some of the individual pothos plants are withering off, but some have also sprouted new growths, kind of averaging it out. The sansevieria is now my cresty's favourite resting spot. He wedges himself between the leaves, almost completely concealed. I wish he'd take advantage of the log hideout I built him, but I'm just glad he's enjoying the plants.
I've still got to install the Monsoon system from my old tank, although for now, my hand mister is doing fine. As a side bar, I'll most likely be revisiting my review of the Monsoon system eventually, as I've had some issues with it since. One of the tubes is also in need of a little patch job. A drop or two of silicone should solve the issue.
In later pics, you'll see the substrate layers; drainage, mesh, and substrate layer. The substrate is a combination of three Exo-Terra products: Exo-Terra Jungle Earth, Exo-Terra Tree Fern Substrate, and Exo-Terra Plantation Soil (brick format). The mixture I used is as follows:
-2 parts plantation soil
-1 part tree fern substrate
-1 part forest soil
This gives me a really nice, fairly natural substrate that is both visually appealing and thus far totally functional. Plenty of drainage and a good amount of water retention.
I've also added a couple extra pieces of wood, drift wood and grapewood. I originally planned to use them for the leo tank, but once again, my eyes are bigger than the physical space of my tanks. It's all worked out though, since they fit perfectly into the tropical tank. They give even more jumping and climbing platforms, and help to break the line of sight.
The overall effect has been fairly noticeable. Humidity has been stable at the 50 to 70 percent range, and temperature has been holding at 20 to 25°C.
Psycological effects have been noted as well. Rocza's a little less intimidated by my presence, he eats more freely from my fingers, he's actually walked up to the glass and observed me, and he's gone as far as jumping at my fingers as I worked to place some wires around the outside of his tank. I'm fairly sure it was the twiddling movements that set him off. I placed my hand in right after and he recognized it at once, and tryed to lick Repashy off my fingers.
But enough analysis, time for some more pictures!
 |
| The philodendron leaf on the left covers the feeding dish, giving the gecko a better sense of security while he eats. Having the dish on the door also simplifies cleaning. |
 |
| Formerly, the newest leaf of the philodendron. |

 |
| Jade pothos, now a little more worst for where. |
 |
| Here, we see the pothos wrapped around the grapewood, as well as the log hideaway. And Rocza, of course. |


Next post, I'll show off the third phase of the leopard gecko build, talk about some new product I'm trying out, do a little research into yet another animal I'd like to acquire, and post plenty new pictures. Hopefully, it won't be another month till then!
Sunday, November 4, 2012
Research into Custom Natural Habitats 3: Growing Moss
My black silicone came in, finally! So now that I've started putting substrate to the foam, I'm looking into my next step; growing moss.
Since my attempt at transplanting moss failed epically, I'm trying the 'moss paint' method. There are a couple different recipes I came across: moss and beer, moss and buttermilk, moss and plain yogurt. I chose yogurt as it was cheap, it came in a small format, and to me it would have a more paint-like consistency over the other two options.
I also read and interesting idea on caudata.org (a forum for caudata enthusiasts) that involves using fish emulsion fertilizer to jump-start the moss' growth. After doing a little searching, I found that one of the local types of fish emulsion is Muskie 5-1-1 fertilizer. I had a hard time pinning it down in stores, most likely because it's November. Finally found some at Marlin's Orchard; a very nice orchard and garden store just outside of town.
The recipe I used is as follows:
-1 cup of plain yogurt
-3/4 cup of moss clumps
-couple pea-sized globs of fish emulsion
Blend thoroughly and apply to surface. Mist daily and keep in a cool, shady spot.
 I also went one step further and decided to apply some fish emulsion as a base before pouring on the mixture.
See here is what the mixture looked like once blended. I think I may up the moss ration; the mixture was pretty thin.
Just as an experiment, I applied it to four different surfaces, coating half the surface with fish emulsion and leaving the other half bare. My four materials are a piece of fire wood, a flat stone, a brick, and a plastic cover. This way, I can determine what my moss will grow on, and if pouring it over fish emulsions will make it grow faster or not.
Note: I've read that mould will appear, but that it doesn't mean that the moss is ruined. I guess the moss will grow in after.
Since my attempt at transplanting moss failed epically, I'm trying the 'moss paint' method. There are a couple different recipes I came across: moss and beer, moss and buttermilk, moss and plain yogurt. I chose yogurt as it was cheap, it came in a small format, and to me it would have a more paint-like consistency over the other two options.
I also read and interesting idea on caudata.org (a forum for caudata enthusiasts) that involves using fish emulsion fertilizer to jump-start the moss' growth. After doing a little searching, I found that one of the local types of fish emulsion is Muskie 5-1-1 fertilizer. I had a hard time pinning it down in stores, most likely because it's November. Finally found some at Marlin's Orchard; a very nice orchard and garden store just outside of town.
The recipe I used is as follows:
-1 cup of plain yogurt
-3/4 cup of moss clumps
-couple pea-sized globs of fish emulsion
Blend thoroughly and apply to surface. Mist daily and keep in a cool, shady spot.

See here is what the mixture looked like once blended. I think I may up the moss ration; the mixture was pretty thin.
 |
| Not shown is the plastic cover experiment. |
Sunday, October 28, 2012
Future Aquisition
I've been looking into what I want to get after I move Rocza to his new tank. It's probably going to be arboreal and tropical, since that's what I'm set up for. In truth, I'm not looking to break the bank on this critter either; it will most likely be a pair or a trio of anoles (Anolis carolinensis or sagrei), depending on how much space they require. Anolis carolinensis is the typical green anole while Anolis sagrei is the brown or "bahaman" anole. These are the little guys that first sparked my interest, or at least the first herp I tried to get when I was a wee little lad. I never ended up getting one, probably for the same reasons I can't own a frog or a turtle now. In all fairness to my parents, it's very likely I would have accidentally killed the thing after a week, but I didn't see it that way back then, obviously.
According to PetSmart's pamphlets, crested geckos (Rhacodactylus ciliatus) is beginner level shit. These guys are at least on the same level, if not lower. Maybe it's just because I've seen them for years, but I just feel like they're very easy to raise. Anoles have been in the pet trade for ages, after all. You always see them in these huge groups at the pet store, just chilling out; brown and green anoles living together in their little utopian society.
Well, maybe not quite so technicolour, but still.
I wouldn't mind a mix, myself. It would add a little variety to the tank. The only iffy thing about it is that they are exclusively carnivorous, so I would have to leave crickets in the tank. This frustrates me, since they can get behind the foam backdrop and stay tucked away, chirping into the wee hours of the morning. The only saving grace is that the crickets will probably have to be smalls; too young to be able to chirp. Then again, I'm probably just over thinking this. A war-band of fleet-footed anoles is surely a match for a couple small crickets.
I have also been putting some thought into making an aquatic/terrestrial hybrid tank. I've drawn a couple sketches for a vertical hybrid tank, but... I can't get frogs with my current living condition, so there aren't many options of creatures to put in it.
So since I can't get frogs because I don't have my own house or turtles because my parents don't want "that aquarium smell", I've decided to revisit salamanders and newts (Caudata), like the tiger salamander (Ambystoma tigrinum) to the right here. What's cool about salamanders is that they have larval stages where they are completely aquatic, like frog tadpoles. I don't think I'd get one that young, since I don't think a hybrid tank would have enough water, unless it's really big. Who knows fur sure, though; I may decide to get a pair of larva and see them through to adulthood! This setup would definitely need to be horizontal; most salamanders aren't arboreal. That's not to say I couldn't build up, I'd just have to make sure I give them a nice easy incline. I'll give it some more though.
Another nifty thing about most of the common salamander species is that they not only live in my type of climate, some are even native species. That give me a much bigger range of plants to chose from, and easy access to them. No need to pay 5.00$/lb. of drift wood or mopani wood when I can go out and find tree branches and stones from habitats used by wild salamanders. I should point out that the salamander I really want is native to Europe; the fire salamander (Salamandra salamandra). They still live in similar habitats; clean running water with plenty of mossy cover and places to burrow. Maybe it's only since I've been studying evolution in biology (note that I know use Latin names as well as common), but I find that salamanders have a sort of primal beauty to them. Amphibians were the first vertebrates to crawl up onto land, after all. Plus, I have a penchant for dangerous animals; they're usually much more interesting than their safe, gentile cousins. Clear example: monarch butterfly vs. some... shitty, white, non-toxic butterfly. These fire salamanders produce samandarin, which is a powerful neurotoxin they produce in their skin which causes muscle convulsion and hyperventilation in vertebrates. How cool is that?! Finally, a reason to put a lock on the cage door!
I'll write up another post soon (hopefully) on some research into making moss which I found while looking over some caudata sources.
 |
| Image from http://www.tpwd.state.tx.us/learning/webcasts/urban/urban.phtml |
Well, maybe not quite so technicolour, but still.
I wouldn't mind a mix, myself. It would add a little variety to the tank. The only iffy thing about it is that they are exclusively carnivorous, so I would have to leave crickets in the tank. This frustrates me, since they can get behind the foam backdrop and stay tucked away, chirping into the wee hours of the morning. The only saving grace is that the crickets will probably have to be smalls; too young to be able to chirp. Then again, I'm probably just over thinking this. A war-band of fleet-footed anoles is surely a match for a couple small crickets.
I have also been putting some thought into making an aquatic/terrestrial hybrid tank. I've drawn a couple sketches for a vertical hybrid tank, but... I can't get frogs with my current living condition, so there aren't many options of creatures to put in it.
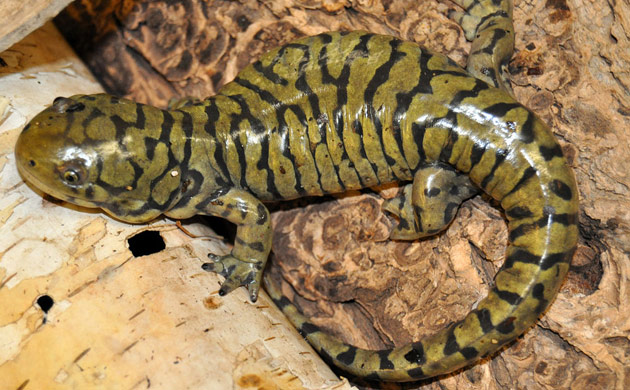 |
| Image from http://www.reptilegardens.com/amphibians-bugs/amphibians/salamanders.php |
 |
| Image from http://firesalamanders.weebly.com/ |
I'll write up another post soon (hopefully) on some research into making moss which I found while looking over some caudata sources.
Saturday, October 27, 2012
Tropical Terrarium Build (part 1)
I've been talking about if for a while now, so it's about time I made a post for it; after many delays, here is a look at my tropical terrarium.
 Bet that was anti-climactic! The truth is, being my first build of this kind, it's taking even more time on top of all the delays. Lacking the proper techniques definitely slows down the process! But I've come up with a few by trial and error, such as stringing up the wood that I'm siliconing in before spray-foaming. I'll get to those tips later on, I'm just giving a bit of a status report on it at this point.
If it looks at all crowded from this picture, that's because it is. In fact, that's what I'm going for. I want maximum amount of furnishing without over-crowding. Also, this picture doesn't really capture the scale of this build; the tank is 18" x 18" x 24". I mean, I can fit my head in there... so it's big. Trust me.
 As show to the right, here, you can see that there is in fact much room for plants. I also feel I should mention that since this particular shot was taken, I added a bunch of foam to the bottom corners to build them up. The reason for this is to minimize the amount of substrate needed in areas where it's not really useful to have it.
Something else clearly visible is how painfully close my pots are to the top of the tank. This is something I learned the hard way to look out for. In the end, I'm sure it'll be fine. The only problem is one of the two pothos plants I wanted to put there is kind of... growing up instead of growing like a vine. I may try to transplant parts of it, or maybe just buy a new one. I'll probably have the room for a third one down at the bottom.
Quick price break down:
-Great Stuff Pond and Stone (which is the black kind): 9.00$/can, 3 cans
-Aquarium Silicone (price carried over from the leopard gecko build): 13.00$
-See previous posts for prices of plants and wood (I hope...)
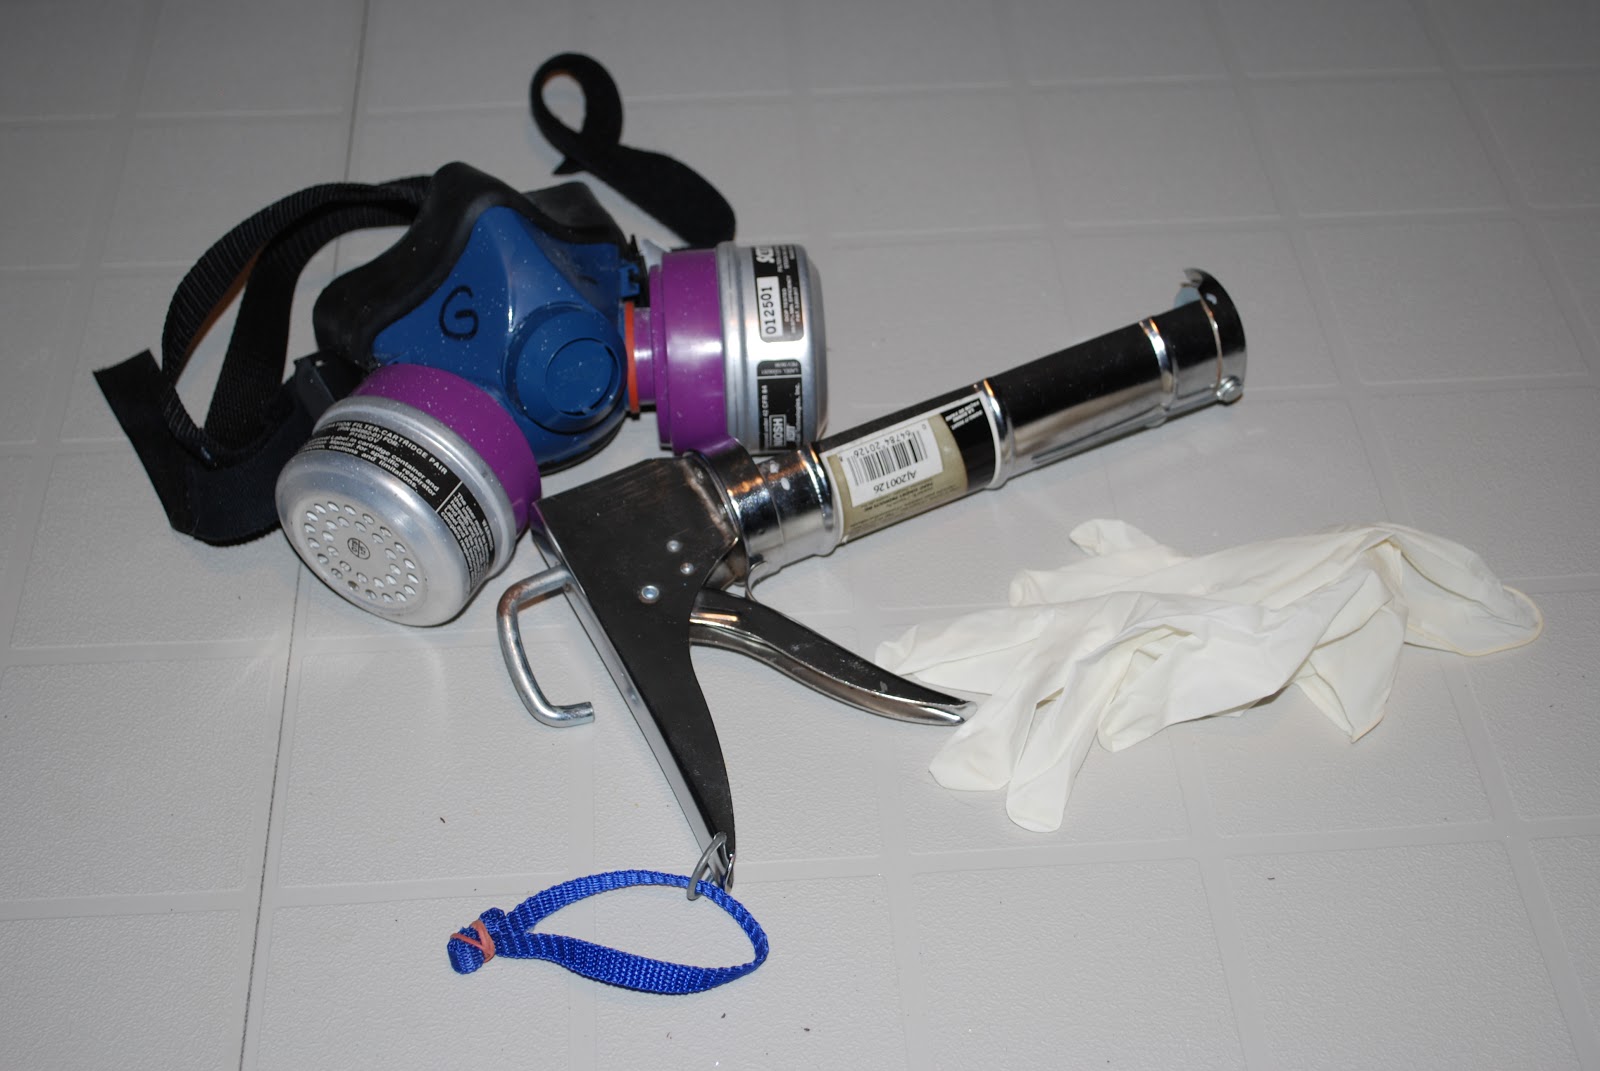
 Some of the tools I used include:
-Breaking Bad costume Breathing mask
-Caulking gun
-Many pairs of disposable rubber gloves.
All of these I had lying around the house. At this point, I also want to point out that I don't condone the use of disposable latex gloves; be kind to the environment and get some nice rubber gloves that you can use again and again. Yes, I am a hypocrite.
I won't add the substrate costs just yet, at least not until I have a better idea how much I will use. Hopefully, Amanda at The Pet Store will live up to her standards and get me some good aquarium silicone by the end of the week!

If it looks at all crowded from this picture, that's because it is. In fact, that's what I'm going for. I want maximum amount of furnishing without over-crowding. Also, this picture doesn't really capture the scale of this build; the tank is 18" x 18" x 24". I mean, I can fit my head in there... so it's big. Trust me.

Something else clearly visible is how painfully close my pots are to the top of the tank. This is something I learned the hard way to look out for. In the end, I'm sure it'll be fine. The only problem is one of the two pothos plants I wanted to put there is kind of... growing up instead of growing like a vine. I may try to transplant parts of it, or maybe just buy a new one. I'll probably have the room for a third one down at the bottom.
Quick price break down:
-Great Stuff Pond and Stone (which is the black kind): 9.00$/can, 3 cans
-Aquarium Silicone (price carried over from the leopard gecko build): 13.00$
-See previous posts for prices of plants and wood (I hope...)
-
-Caulking gun
-Many pairs of disposable rubber gloves.
All of these I had lying around the house. At this point, I also want to point out that I don't condone the use of disposable latex gloves; be kind to the environment and get some nice rubber gloves that you can use again and again. Yes, I am a hypocrite.
I won't add the substrate costs just yet, at least not until I have a better idea how much I will use. Hopefully, Amanda at The Pet Store will live up to her standards and get me some good aquarium silicone by the end of the week!
Subscribe to:
Posts (Atom)