Showing posts with label terrarium. Show all posts

Tuesday, January 15, 2013

Leopard Gecko Build (part 4)

After reviewing my third post on the leo build, I realize I never got around to talking tech about the methods and materials used for the foam rock cave.

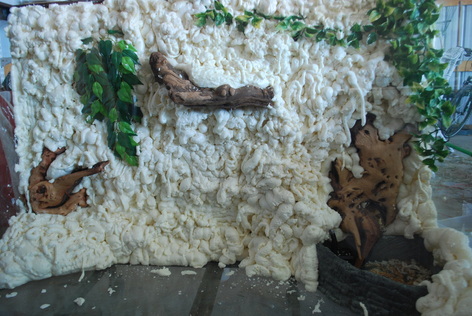
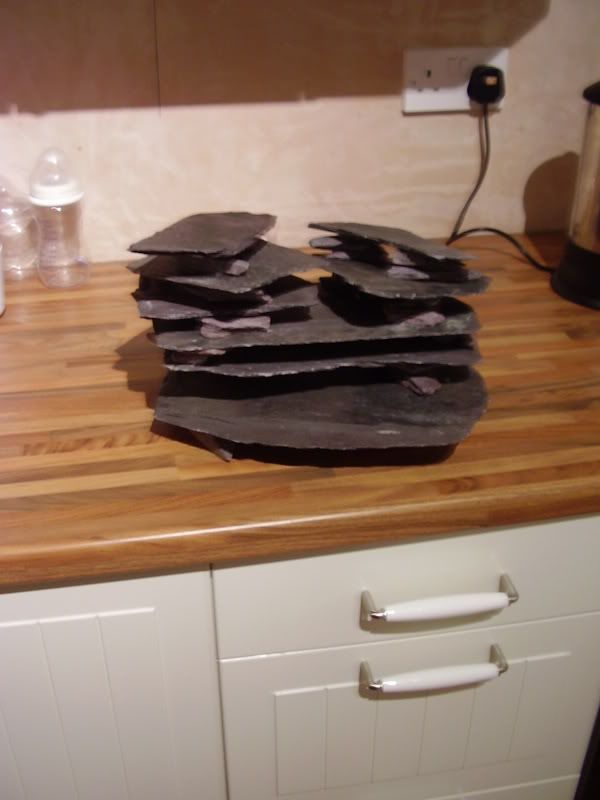
Therefore, as promised, methods and material review for my rock cave!
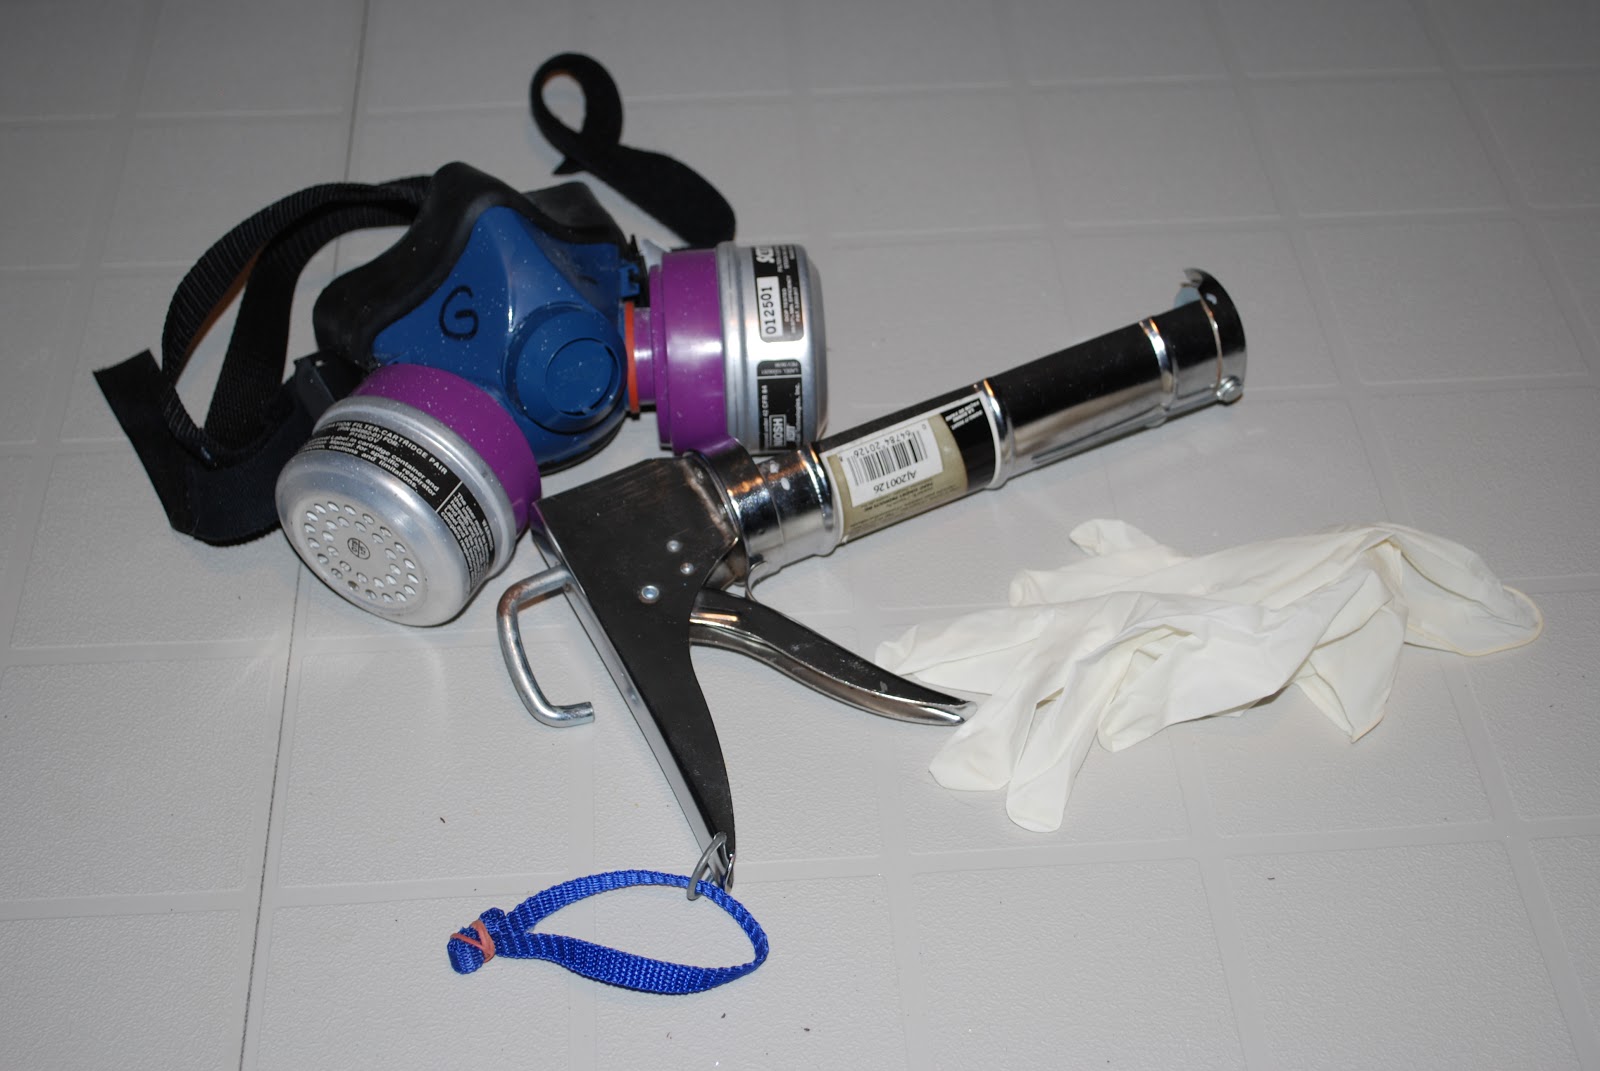
Materials
My best advice here is to keep searching until you have exactly what you want.  I spent weeks trying to find Modge-Podge, finally settling for Liquitex, a similar product.  Ironically, I later found Modge-Podge at Wall-mart for half the price.  Now, I have to say, however, that the Liquitex seems to have worked really well.  It was the least toxic substance I could find, it was the right finish, and it is resistant to moisture.

For the paint, all I did was dig through some old (really old) arts and crafts boxes in the basement and found a decent pallet of naturalistic rock colours.  I based my pallet choice on some of the rocks I've collected to use in future tanks; rocks found along the shoreline, in fields, etc.  Rocks are one of the few things I prefer to find outside than actually buy. They aren't porous (obviously) so they're easy to disinfect and use.  Sorry, side-bar.  This is one of the parts of the build that might require a bit of an artistic background.  I've been taught colour selection and identification since I was young, so it's all fairly second nature to me.  Luckily for everyone, the rules of art are somewhat flexible.  And by that, of course, I mean it's all up to you.  It all comes down to what you're able to achieve.  Choose colours that reflect the type of habitat you want to create for your animals.  For this build, as I recall, I used the following colours; a creamy white, a deep blue, a dark grey, a mocha brown, and bit of black.

Lastly, the right tools for the right job.  I'm lucky enough to have a plethora of brushes both new and old kicking around.  I used just one brush for the majority of the painting, one sponge brush for the sealant, and one fine brush for the cave painting details.  I originally wanted to use a spray-bottle  to apply the sealant, but Liquitex specifies not to mix with water, which would have been necessary to reduce its consistency.  The sponge brush work fairly well, leaving a nice pitted texture, which I found worked better than the unnatural strokes of a course brush.

Methodes
The best way I can describe how to get a natural rocky look is to just dump on the paint.  Don't mix it on the pallet, mix on the canvas (the rock).  This makes for a blotchy, heterogenous mix of colours which looks much more natural than straight lines of different, solid colours.  Another tip is just that, the tip.  Use the tip of the brush and... just... tap it on.  Hard to explain.  Let the bristles give the rock that "sprayed on" look like that of centuries of mud and weather working on the stone.  Once you've got a nice mix of colours, don't over work it!  This will blend the colours and ruin that natural texture you've jsut spent fifteen minutes getting!
Also, don't feel rushed, but if you can establish a base over the entire build while the initial coat is still wet, you'll have a much easier time mixing the colours up just the way you want them.  If, by chance, you want a dusty look, try a little dry brush action, which I won't get into detail here.  I'll leave that up to the much artsier people of the internet.

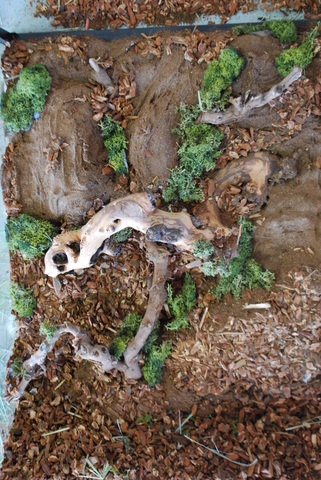
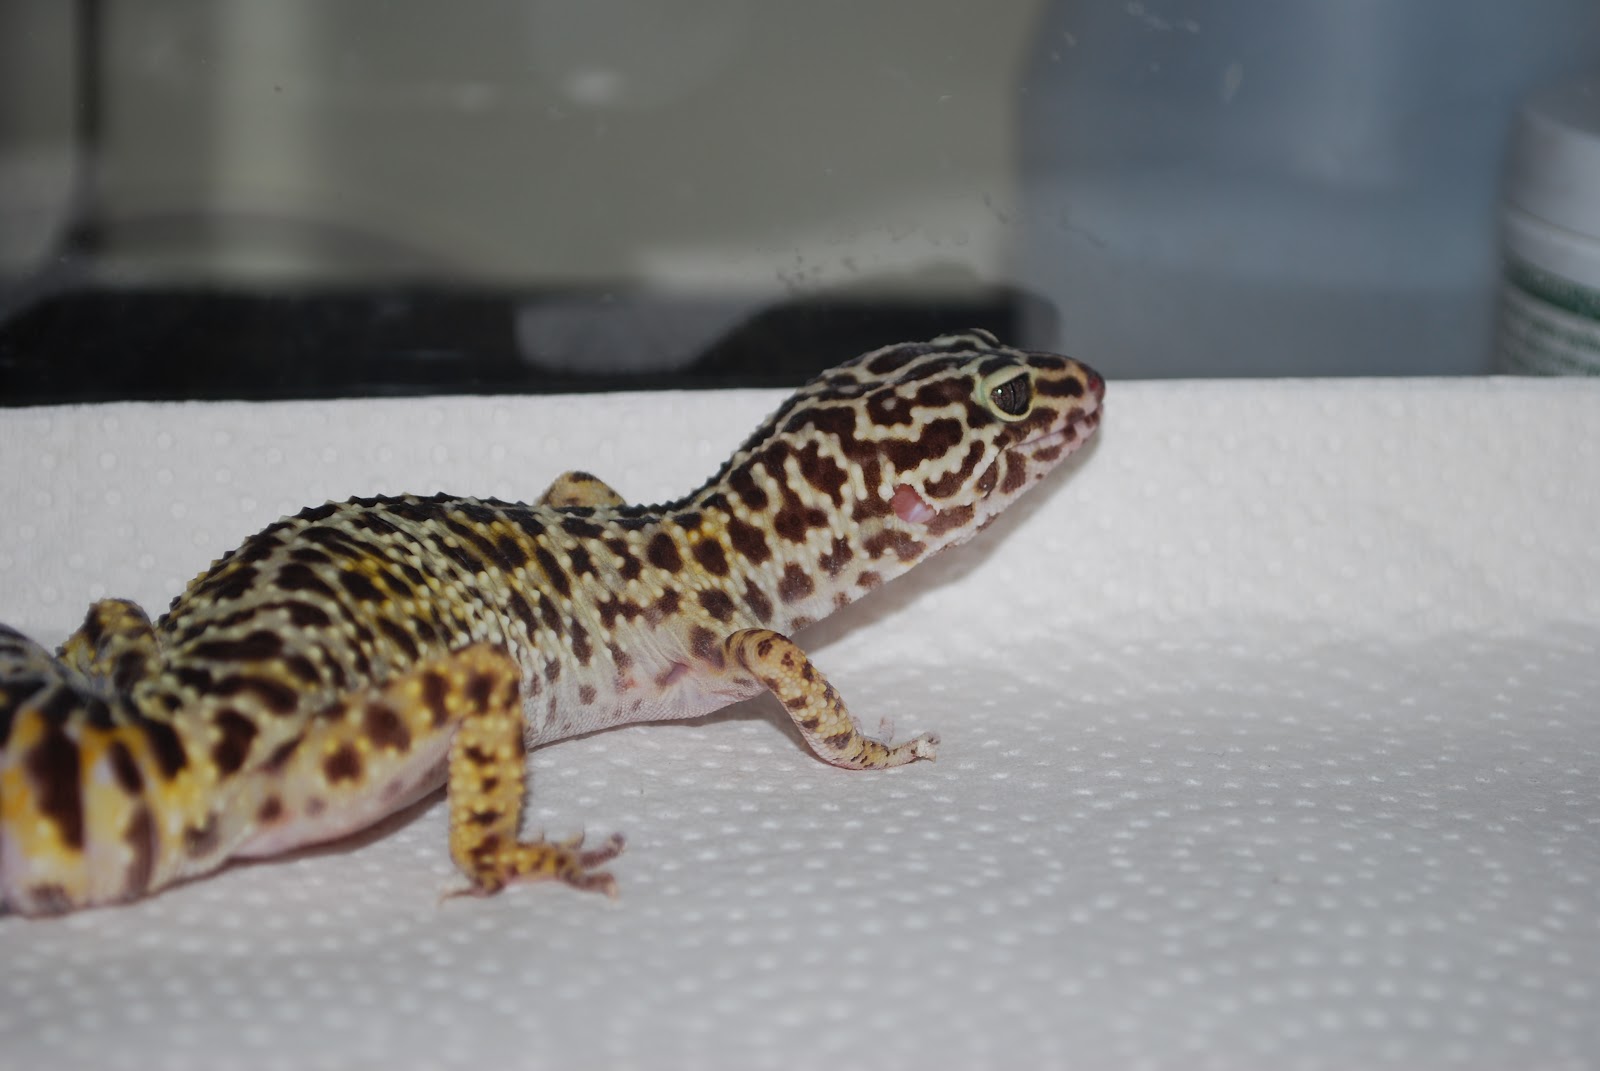
You want to see the third phase of the leo tank?  Yeah you do.


For anyone who's followed the progression of my leo tank, much change can be observed.  Chief among them, the substrate.  Although the use of sand makes me leery, this is not your run of the mill sand.  It's Zoo-Med's Excavator Clay Burrowing Substrate.  Before I launch into it, I have to mention the following:

This is a clay-based substrate; there IS a risk of impaction.

Having said that, here's why I still chose to use it.
First of all, the clay is a great base to hold all the driftwood and stones in place, and it makes for great hills and depressions.  It also holds heat far better than the Eco-Carpet.  It's also more natural and visually appealing, though by no means should you compromise functionality for looks.  This clay sand compacts nicely and forms a fairly solid base.  It's much harder to accidentally ingest this than regular sand.  Also, in my case, the crickets usually make for the dark "safety" of the cave.  As such, the cave still makes use of the Eco-Carpet, for exactly that reason.  It becomes the feeding ground for crickets.  Another designated feeding area is the large flat stone I sunk into the clay sand just outside of the cave.  So far, it's been great.

The clay is made of sculpt burrows and tunnels, but I've heard tales of the tunnels collapsing, most likely due to poor construction.  I didn't even try this, for exactly that reason; I didn't want to risk having a tunnel collapse on my leo. 

The overall result has so far been pretty good.  The cave, thanks to the new Heat Wave Desert under-mounted tank by Exo-Terra, I'm holding a pretty cozy temperature inside the cave.  I haven't yet been able to buy the thermometer I've been eying to get an exact reading, but it's certainly around 30 °C.  Bronka spends most of his time basking half inside the cave, half outside, sleeping right under the heat lamp.  I put not a small amount of thought into the layout of this setup; the cave is both the first and second floor of a three-storey "bungalow", the third being the old piece of driftwood I've been using since I first got him.  This layout effectively creates a sort of Rete's stack, despite the fact that it's far warmer at the bottom.  The new piece, clearly visible on the right, was a great find! It's hollow, making for a very cozy natural hide out of the direct light.  I will be placing moist moss in it soon enough, finally providing the two natural hides he should have; cool and warm, dry and moist.  I've seen him out exploring much more since he's moved in.  I truly thinks he enjoys it!  The front door access has made picking him out ofthe tank much easier, allowing me to handle him much more than before!

Although I could fit a couple extra furnishings, I think I'll limit myself another rock or two, just to minimize the overall amount of open sand, effectively reducing risk of ingestion.  He has a lot to climb on as it is, and I think he appreciates the wide open spaces he now has as well.

***

Coming up in the next post, I'll talk about the creature I'm really working on acquiring, and possibly revisit some of my previous product reviews.

Monday, January 14, 2013

Tropical Terrarium Build (part 2)

First, a little catching up after the holidays!

Regrettably, my moss project didn't go so well.  I think it was due to a poor mixture and lack of sufficient natural lighting.  I think I'll give it another try in the spring, after the melt, when the moss will be accessible.  This time, I'll give the beer recipe a try.  Or maybe even both yogurt and beer, for a comparative analysis.

I've also got a bunch of new pics to put up!  Lots of new things in both my leo's habitat and my tropical terrarium.  My leo's build has been completely upgraded, tank and all.  For Christmas, I got the Exo-Terra Medium Low terrarium; much nicer than an old aquarium!  I'll get into that on a different post.

For now, I'll showcase my tropical terrarium.

***


Behold, the final product of my tropical build!

It's not quite what I had envisioned, but I'm satisfied with it.  I was obviously hoping for a little moss in there, but I may yet be able to culture some and transplant it.  In the meanwhile, I bought some Zilla Premium Compressed Frog Moss to toss around  for a little extra splash of green.  I'm glad I didn't try to stick it down; it works much better just fluffed about.  The colour can be a little dominating if I put too much of it in one spot. 

Also note that my plants have been trimmed down and separated.  I mixed up my pothos a little, so I hope that they won't be in direct competition for root space.  The gold pothos (just visible on the right) is doing fine.  It's sprouted a couple new leaves in the time since it's planting, meaning that it is doing well.

I was having some trouble with the philodendron and sansevieria (snake plant), however.  When I put the Zoo-Med Hydroballs in, I oversaturated the soil.  This lead to me loosing a couple philodendron leaves and a sansevieria stalk to overwatering.  Still, being fairly hardy plants, they've totally bounced back.  The philodendron has also sprouted two new leaf, which are not visible in the above image.  Some of the individual pothos plants are withering off, but some have also sprouted new growths, kind of averaging it out.  The sansevieria is now my cresty's favourite resting spot.  He wedges himself between the leaves, almost completely concealed.  I wish he'd take advantage of the log hideout I built him, but I'm just glad he's enjoying the plants.

I've still got to install the Monsoon system from my old tank, although for now, my hand mister is doing fine.  As a side bar, I'll most likely be revisiting my review of the Monsoon system eventually, as I've had some issues with it since.  One of the tubes is also in need of a little patch job.  A drop or two of silicone should solve the issue.

In later pics, you'll see the substrate layers; drainage, mesh, and substrate layer.  The substrate is a combination of three Exo-Terra products: Exo-Terra Jungle Earth, Exo-Terra Tree Fern Substrate, and Exo-Terra Plantation Soil (brick format).  The mixture I used is as follows:
-2 parts plantation soil
-1 part tree fern substrate
-1 part forest soil
This gives me a really nice, fairly natural substrate that is both visually appealing and thus far totally functional.  Plenty of drainage and a good amount of water retention.

I've also added a couple extra pieces of wood, drift wood and grapewood.  I originally planned to use them for the leo tank, but once again, my eyes are bigger than the physical space of my tanks.  It's all worked out though, since they fit perfectly into the tropical tank.  They give even more jumping and climbing platforms, and help to break the line of sight.

The overall effect has been fairly noticeable.  Humidity has been stable at the 50 to 70 percent range, and temperature has been holding at 20 to 25°C.

Psycological effects have been noted as well.  Rocza's a little less intimidated by my presence, he eats more freely from my fingers, he's actually walked up to the glass and observed me, and he's gone as far as jumping at my fingers as I worked to place some wires around the outside of his tank.  I'm fairly sure it was the twiddling movements that set him off.  I placed my hand in right after and he recognized it at once, and tryed to lick Repashy off my fingers. 

But enough analysis, time for some more pictures!

The philodendron leaf on the left covers the feeding dish, giving the gecko a better
sense of security while he eats.  Having the dish on the door also simplifies cleaning.

Formerly, the newest leaf of the philodendron.


Jade pothos, now a little more worst for where.

Here, we see the pothos wrapped around the grapewood, as well as the log hideaway.  And Rocza, of course.


Next post, I'll show off the third phase of the leopard gecko build, talk about some new product I'm trying out, do a little research into yet another animal I'd like to acquire, and post plenty new pictures.  Hopefully, it won't be another month till then!

Sunday, November 4, 2012

Research into Custom Natural Habitats 3: Growing Moss

My black silicone came in, finally!  So now that I've started putting substrate to the foam, I'm looking into my next step; growing moss.

Since my attempt at transplanting moss failed epically, I'm trying the 'moss paint' method.  There are a couple different recipes I came across: moss and beer, moss and buttermilk, moss and plain yogurt.  I chose yogurt as it was cheap, it came in a small format, and to me it would have a more paint-like consistency over the other two options.

I also read and interesting idea on caudata.org (a forum for caudata enthusiasts) that involves using fish emulsion fertilizer to jump-start the moss' growth.  After doing a little searching, I found that one of the local types of fish emulsion is Muskie 5-1-1 fertilizer.  I had a hard time pinning it down in stores, most likely because it's November.  Finally found some at Marlin's Orchard; a very nice orchard and garden store just outside of town.

The recipe I used is as follows:
-1 cup of plain yogurt
-3/4 cup of moss clumps
-couple pea-sized globs of fish emulsion

Blend thoroughly and apply to surface. Mist daily and keep in a cool, shady spot.

I also went one step further and decided to apply some fish emulsion as a base before pouring on the mixture.

See here is what the mixture looked like once blended.  I think I may up the moss ration; the mixture was pretty thin.
 Just as an experiment, I applied it to four different surfaces, coating half the surface with fish emulsion and leaving the other half bare.  My four materials are a piece of fire wood, a flat stone, a brick, and a plastic cover.  This way, I can determine what my moss will grow on, and if pouring it over fish emulsions will make it grow faster or not.

Not shown is the plastic cover experiment.
Note: I've read that mould will appear, but that it doesn't mean that the moss is ruined.  I guess the moss will grow in after.


Saturday, October 27, 2012

Tropical Terrarium Build (part 1)

I've been talking about if for a while now, so it's about time I made a post for it; after many delays, here is a look at my tropical terrarium.
Bet that was anti-climactic! The truth is, being my first build of this kind, it's taking even more time on top of all the delays. Lacking the proper techniques definitely slows down the process! But I've come up with a few by trial and error, such as stringing up the wood that I'm siliconing in before spray-foaming. I'll get to those tips later on, I'm just giving a bit of a status report on it at this point.

If it looks at all crowded from this picture, that's because it is. In fact, that's what I'm going for. I want maximum amount of furnishing without over-crowding. Also, this picture doesn't really capture the scale of this build; the tank is 18" x 18" x 24". I mean, I can fit my head in there... so it's big. Trust me.

As show to the right, here, you can see that there is in fact much room for plants. I also feel I should mention that since this particular shot was taken, I added a bunch of foam to the bottom corners to build them up. The reason for this is to minimize the amount of substrate needed in areas where it's not really useful to have it.

Something else clearly visible is how painfully close my pots are to the top of the tank. This is something I learned the hard way to look out for. In the end, I'm sure it'll be fine. The only problem is one of the two pothos plants I wanted to put there is kind of... growing up instead of growing like a vine. I may try to transplant parts of it, or maybe just buy a new one. I'll probably have the room for a third one down at the bottom.

Quick price break down:
-Great Stuff Pond and Stone (which is the black kind): 9.00$/can, 3 cans
-Aquarium Silicone (price carried over from the leopard gecko build): 13.00$
-See previous posts for prices of plants and wood (I hope...)

Some of the tools I used include:
-Breaking Bad costume Breathing mask
-Caulking gun
-Many pairs of disposable rubber gloves.

All of these I had lying around the house. At this point, I also want to point out that I don't condone the use of disposable latex gloves; be kind to the environment and get some nice rubber gloves that you can use again and again. Yes, I am a hypocrite.

I won't add the substrate costs just yet, at least not until I have a better idea how much I will use. Hopefully, Amanda at The Pet Store will live up to her standards and get me some good aquarium silicone by the end of the week!

Leopard Gecko Build (part 3)


Finally, some new pics of my first rock outcrop project!


As is clearly shown, I have painted my rocky outcropping and I've even managed to seal it. Heck, I've even managed to put a nick in it! Fortunately for me, it's in the back, where it won't be visible.

For a bit of an idea of the price of this part of my build, check out my quick break down:
-Rona Sanded Grout: 10.00$
-Rona No Sheen Grout Sealant: 10.00$
-Liquitex Matte Varnish: 20.00$

Throw in some left-over acrylic paint and some old brushes I had kicking around, and there you have it.

All I really have left to do now is give it a bit of a washing, but only once I touch up my little ding. I was going to put on a third coat of varnish, but after the second, I find that it starts to get a little cloudy. Since I don't intend on this piece to go in a humid environment, I think two coats should do just fine. The Liquitex is made for outdoor use, after all.

Quick fun fact; i made some crappy little cave paintings inside, just for funzies.

This build turned out way bigger than I had originally anticipated! I will definitely need a new tank soon. Thankfully, Christmas is just around the corner! I'm thinking possibly one of Exo-Terra's new Low models, but that's going to depend on prices.

I digress; next post on this particular project will be the conclusion post, wherein I will give a total break down of what I used and what I would not use again, as well as helpful tips for getting a natural finish and how to avoid annoying bubbles in your varnish!

Wednesday, August 29, 2012

More Plants

For part two of today's posts, I'm showing off the newest plants I got for my cresty build. To be fair, "new" is relative, as I have had these for a couple weeks now, and despite a little feline intervention, the majority of them are still alive!

Firstly, I picked up another pothos, but instead of a Jade pothos, I picked up a Gold pothos.
I also found this really nice philodendron which has the best leaves ever! Perfect for a shy little gecko to chill out on. As time goes on, the leaves will develop splits and become more articulated. It also spreads fairly well, I'm told, so I'll be trimming it fairly often.

Also, I finally found the perfect sized snake plant, which sadly became the target of a cat attack and lost a couple leaves...
Lastly, and this one might not make it through to the terrarium, is this cute little Venus Fly-trap. I've fed it several times, forgetting that each "mouth" only feeds once before it dies. So, as a result, I'm left with a plant with very few mature "mouths". Still seems to be living though, so, yay!
Also, though I didn't technically buy this, I harvested a little moss from my back yard and have so far been able to keep it alive on nothing but a rock, so kudos to me!

I plan on incorporating most of these plants, if not all, and a couple more into my cresty build, which, as it happens, I'm currently in the process of building! Finally! I'll definitely post phase 1 tomorrow, when I have a few more things completed.


Leopard Gecko Build (part 2)

Lots of new events going on this past month, which is why I plan on making a second post after this. Just trust me on this one.

I'll start off with the foam rock I'm making for my leo.
After re-evaluating the size of my setup and the size of the rock I was making, I decided to cut it down a bit, leaving me with this:

If you can see it, I've also added a tunnel going from the main chamber and exiting on the side. I figured this build is goign to take up a lot a floor space, and that by adding layers like this, I'm just adding on to the amount of space my leo will have to explore and hunt. There's also a secondary chamber inside which would be visible from the back.

After a little YouTubing, I found this great video by Beckywheeler (check her out), who has a TON of DIY foam background videos. Her technique for making foam rocks look more natural is to torch them with a lighter. I supose an actual torch would work here too, but that just seems like over-kill to me. My BBQ lighter did a great job, even with its sputtering little flame.

So after torching all the flat surfaces to give them a more pitted, uneven texture, and after torching down the 90 degree corners, I ended up with something like this:
And, I don't mean to gush, but for my first foam construction, I've exceeded all my own expectations! I even went as far as to torch the inner tunel and chambers, which really make it look like rock, I think.


Also, a couple weekends back, I bought some grout and some sealer, so all I need now is to find my old acrylic paint and I'll be able to wrap this project up!

Tuesday, July 24, 2012

Got Wood?

First off, as promised, the pics of my new swag loot that I got the other weekend:


I did a bit of research into the mopani wood, since I want to learn how to get rid of the sap once and for all. I guess, from what I've read, I just have to keep soaking it and boiling it.

More disturbing are the horror stories I'm coming across of how the tannins can cause fungal grows, psychological disabilities in the animals, and a mess of other things. But then I read posts from people who've been using this stuff for decades. I think it's a case of improper preparation, personally.

Still enough to worry me though.

Side Note: I am still looking for a decent-sized pot to boil my wood pieces in. Got them soaking for now, but I want to boil them a couple times before siliconing them in place. I just wish I knew how much OSAP I'm getting this year! It's kind of my limiting factor as to what I can and can't buy. With all the (long) extra hours I've scored at my job, I should have enough spare cash to really trick out my tanks, at least if my price estimates are decent.

So my question today is this: 

Is mopani wood dangerous for reptiles, and more specifically, crested geckos?

From what I've been reading on Reptile Forums UK and Herp Center, it should be fine. Lots of people use it, and have been using it for years without any incident.
To be fair, the stories I read about where the animals developed neurological symptoms were talking about different species of geckos. And in all honesty, it doesn't seem unthinkable that some species have different reactions to different types of plants or wood.
My greatest fear is that once I've foamed my wood pieces in places, something will occur that will force me to remove them, along with my entire background. It's not like these tanks are cheap to decorate, so I want to get this done, and get it done right.

***

Next on my hit list is a bromeliad plant! Maybe a crawling vine too. I also need to repot that jade pothos, in order to remove as much of the fertilizer as possible.

Sunday, July 15, 2012

So many goodies!

I just got back from Ottawa today with a couple bags of funky stuff for both my terrariums. At Big Al's, I found some nice little pieces of mopani wood that I'm going to use as accents for both my tropical and arid terrariums, along with some Malaysian drift wood. On my way back across the plaza, I stopped in at Rona's garden center and was really surprised by this young guy there who was quite savvy about tropical houseplants. I bought a jade pothos plant, though I could have bought a lot more! They had snake plants and a whole mess of everything. Lastly, on my way past PetSmart, I stopped in for the heck of it and found a cork round. All in all, a pretty decent haul, and all of it for under 40$! I think I'm good for wood now. All I need is some fake rocks which I plan to make myself, some substrate and a couple other miscellaneous goods and I will be ready!

Also, I got my new top in from Stacey's, which I ordered a week and a half ago to replace my rusting one temporarily while I mod it up a bit. It looks like the tops I've been using up till now were Exo-Terra's older models, as this one isn't exactly the same. I'm hoping it will still fit, just to use it as a temporary lid. It was only 15$, after all, so I don't feel that bad. If it doesn't I can always return it.

Pictures to follow.


Monday, June 25, 2012

Take Oxygen (O) and Iron (Fe) and You Get?

The answer is rust. And I just noticed I have something of a problem... At first I was pretty ticked with the terrarium for rusting out so much, but it's not technically a defect in the product, per se.


This is the damage. What happened is that one of my Monsoon's suction cups came loose, tilting it's angle way up, but not enough for me to really notice. It was also spraying under the canopy, which is don't move too much as Rocza likes to use its cover as his shelter. Well, I moved it last night, and found this. Not happy. There was still water droplets on it, with rusty water and all. Very unhappy, but mostly at myself.

I read up on this, obviously, found that it's not just me who's had this problem (again, obviously). And although to be fair to Exo-Terra, although their terrariums are listed as tropical, this level of moisture on this particular surface isn't really what one would normally have. This entire paragraph to say "I'm not angry at you, Exo-Terra, just disappointed". I've seen other companies paint their mesh with a sealing coat of paint, so I wonder why Exo-Terra couldn't also do this, even if these pieces are out-sourced.

So some solutions I found range from temporary and simple to complex.
The most basic, which I have begrudgingly done for the time, is to slide a sheet of plastic-wrap between the tank and the lid to create a waterproof barrier. This will also raise the humidity and heat levels, since over half of the relatively open top is now shut off. I'm not disappointed about that though, in fact it's a plus.
The second solution, which I also utilized, was to order a new lid. I ordered through Stacey's rather than to do it independently, since they know the proper channels. I know I probably could have whined to Hagen or Exo-Terra and got a free lid, but I don't really care. This is my bad, I will pay for my own mistakes. I always have. It will take some time, so that's why I also went with the temporary solution.
Solution number three; spray your lid with hydrofuge paint. Simple enough, and I will definitely do that with my new lid, and all subsequent lids from now on.
Now, the fourth solution is kind of cool. I found a thread (where is it now... Oh yes, right here) posted on Reptile Forums UK by KJ Exotics on how to convert the Exo-Terra tops into glass tops with sliding doors. Pretty cool stuff, and easily adapted to my situation. I think once my new lid arrives, I will repair my damaged lid in this way, since I know a bunch of people in the glazing business. Props for working for general contractors!

So for now, it's the El Cheapo method whilst I wait patiently for Emily to get back to me about my lid! Once I get some of the products, I'll be sure to post exactly what I'm using. Which I should probably do sooner than later, as I ahve not updated my list of products in ages...

Side bar here; anyone in the Cornwall region who has questions regarding reptile care, go see Emily. She knows stuff! But that's just, like, my opinion, man.

Wednesday, June 20, 2012

Research into Custom Natural Habitats 2: Backgrounds

A little late on my idea to post more findings for making the natural habitats but with studying for my chemistry refresher courses, the heat we've been having lately, as well fretting over tuition and grant money, it kind of got back-burnered.

Anyway, I found a really decent website for Do It Yourself naturalesque backgrounds called Bamboo Zoo, which links to several threads on Reptile Forums UK.
The setup I really liked was the Reptile Habitat in Foam by Hedy S., shown below. I've been trying to get a hold of some black spray foam from a guy at work, which is an idea I found on Youtube posted by bshmerlie which I will also post below. (Note to self, don't start Youtubing Skyrim soundtrack female covers!)
 What I like about Hedy's background is the way their mopani wood seems to grow out of the backdrop, something which I feel gives natural backgrounds some credibility. I also like how they added a couple synthetic plants as accents.

Image from BambooZoo
Now before I skip ahead to the part I like the most about Hedy's setup, here's the video posted by bshmerlie on how to create a spray foam background, hosted by Sherry. It's long, but very informative.

Just to note, I've been around to a couple places, even asked some of the contractors at work, and no one has even heard of black spray foam insulation in my part of town till just now. Not sure if this black Great Stuff is strictly an American product, but I certainly can't find it. Now what I like about Sherry's technique is how it stand up to wear and tear versus the generic white spray foam background. I think I might use a bit of a mix of black and clear acrylic, using the clear around the mopani wood to avoid black spots.

Now to get back to Hedy's setup, they use a mixture of substrates which really give it a natural feel. They even use a bark background, like the one Zoo Med but which I cannot seem to find on their product site.

The end result is this stunning piece of work.

Image from BambooZoo
What I really like is the mixture of the fine-grade Eco-Earth and larger Repti-Bark, both from Zoo Med.

I'd also really like to try to find a good way to grow moss on the mopani wood. Exo-Terra has the Tree-Fern Panels, but I'd like to know if they're in any way malleable once it's soaked. Also, I'd like to see if it actually does as advertised and grows small ferns and mosses.

So my shopping list is as stands:
-Spray foam insulation (preferably black)
-Aquarium-grade black silicone (I already have clear)
-Mopani wood (you can never have enough)
-Cork bark rounds (mix things up a bit)
-Plants
-Fine substrate (probably the bag format of Exo-Terra's plantation soil)
-Coarse substrate (some bark or coco husk)


And that's just for my cresty!
I'm planning a second upgrade for my leo already. He's very curious and loves to explore. unfortunately, all I have for him are aquariums which are more vertical than horizontal.
If I could get my hands on a nice-sized low and wide tank, I'd be happy. I'm also planning on introducing some greenery into his environment, like this Jade cactus.
Maybe some of my other synthetics as well, since it would be hard to keep his habitat dry like he needs it and still have nice plants. I'll work something out though. I'm also going to need some things for his hab.

-Sand (not as an actual substrate, but as a sub-substrate, jsut to hold the rocks off the tank bottom and stop crickets from hiding under them)
-Concrete grout (with which to cover my foam)
-Lizard-friendly sealant (to protect the grout)
-Large pebble substrate (to go over any sand that may be visible)


I have a lot to keep me busy, on top of all the things that currently keep me busy...

Saturday, May 5, 2012

Leopard Gecko Upgrade

Dug out more goodies from the basement today.

Firstly, I vinegarred and scrubbed my old collard lizard tank. I should also note here that in my last post, I said I was soakign the log and rock in vinegar. This is not literally true. It was a solution of about 10% to 20% vinegar diluted in water. Very important.

I also found the bestest (truly) rock kicking around my basement. Don't ask why there are rocks in my basement. My family collects strange things. For example, I have a carousel horse down there. But I digress.
The rock I found will definitely suit Bronka's needs for the moment, but once I start the decoration phase of my ackie monitor project, this rock will make a great component for the Rete's Stack.

What's a Rete's Stack, you ask? It's this cool little bit of herpetocultural ingenuity. It's traditionaly a stack of ply wood boards, spaced about and inch to an inch and a half apart, stacked maybe five or six high with access to each level.

Photo by Pro Exotics
 
It's a great little piece of furniture! Not only does it make a decent hide, when placed under a heat lamp it gives the reptile a gradient of temperature to choose from. I've seen some nice twists on this concept, my favorite being one made out of slate.

Photo by dannyj and posted in a thread on Reptile Forums UK
The rock I have is slightly thicker but holds heat nicely and has some really interesting metallic veins in it. For now though, it will be put to good use as a nice solid substrate for Bronka, as show.

With the added space of the larger tank, I've had no trouble spreading out the furnishings to my liking. I'll even be able to add a foam piece one day. Bronka has also taken to the log and the way I laid it over the Exo-Terra cave. For the full set of images, I'd rather just redirect to the Photo Bucket slide show I will be adding to my home page.

Friday, May 4, 2012

Addopted Leopard Gecko

I got the leopard gecko this afternoon. He's a very charming animal, fairly bulky, with a real mild temper.

I'm writing this now because, quite frankly, I've been busying myself fixing up his vivarium as best I could since I got him home at 4:30. But before launching into my mini-tirade, a picture.


In light of his girth and physical size, I've decided to call him something burlier; Bronka (I kind of fabricated the name, not knowing it was actually a small Polish village).

Bronka's is a long story of moving from place to place, like a drifter. He began as the pet of a college student who, due to housing issues, was no longer able to keep him. Bronka found a new home with an acquaintance of mine, who took him in, loved him, cared for him, but ultimately had to move away to Vancouver and had to leave him in her mother's care. Unfortunately, her mother had other pets to tend as well and thus had to pass Bronka along. This is where I enter the picture.

This guy has a couple scars, too.

Some of his toes no longer have claws. In fact, some tips are simply gone. This, to me, is caused by one of two things (or two of two things), the first on my list being lack of humidity during shedding. The skin doesn't slough off, gets tight, restricts blood flow, and ultimately causes amputation.It really hurts me to think of this happening to a single toe, let alone about four.
And this is something that can easily be overlooked by the uninformed hobbyist. My friend noted that this was a condition Bronka had when she got a hold of him.

The other thing which could have cost Bronka his toes is slightly less likely in my opinion, though I can't really say, having very little contact with meal worms.
I'm told meal worms can and will bite. Now, when I picked up this little guy, I noticed the husk fiber was literally writhing with worms. I also noticed a trio of over-sized crickets bouncing around. I just hope they didn't decide to start feeding on the very creature they themselves were meant to feed.

Speaking of the coco husk, after some research, I found that it's not the best environment for leopards. Too much humidity retention. Too bad though, it looks nice. It's jsut not the right stuff, unfortunately. (Not to mention it BEING ALIVE WITH FREAKING WORMS!!!!! Gah... Terrible night to have stuffed manicotti).

Also, less of an issue, his tailed has previously fallen off. I knew this going in, having talked with the previous owner some time ago before she left for Vancouver. It's no big issue, since leos have regenerative tails, though apparently not toes. Strange.

I made a judgement call not to use some of the gear that Bronka came with.

The Exo-Terra heat rock, though probably one of the better ones, is still too much of a worry to me to have it in the tank anymore. I've read  too many articles and heard too many stories of malfunctions to have peace of mind. So, I'll be picking up an under-mounted tank heater (like the one I have for Rocza, just stronger).
All in all, I ended up keeping the Exo-Terra  Medium Reptile Cave... Um, the food dish which I swapped out for a smaller one of mine and that's about it. The piece of wood that had been used as tank decore was worm-eaten, and looked kind of tall for him to climb up.

Now this is his current habitat:


Yeah, pretty sparse. And, with some rather unsettling financial issues I've been having, I wasn't really able to go out today and get anything better.
Here's where it's lucky to have a large basement filled with clutter of years past. I dug deep and pulled out a nice log and large flat rock from my old collard lizard habitat, just what this blah habitat needs.
I am currently soaking them for the second time in vinegar, and am about to rinse and soak for a third time before baking them both off.
As for the paper towel, unattractive though it may be, it's safe, easy to clean and keep moist, and it's readily available.

And now, more pics.

Bronka basking in his red heat lamp.
Going to rest up after a long day.
More pictures to come once I pimp out his hab a bit.

Back From Vacation and Right Back Into It...

The lack of posts over the last week and a half would definitely be caused by the fact that I was in Halifax, visiting a friend. But this is not a travel blog, so I will dispense with the details.

A couple updates for now, but they're not small updates.

Firstly, I have been doing research and have decided that in the coming years I will be buying a Ridge-Tail Monitor, more commonly called an Ackie. It's an Australian species of dwarf monitor that grows to about 2' (60 cm) in length, most of that being tail. They're very energetic, active and inquisitive. The other cool thing about getting this animal is that no tank on the market will do to hold it; I must go into the realm of custom-built tanks. Don't think I'm serious? I'm going to the hardware store today.
The tank definitely has to come first. I might even have it for a year or so before I decide it's good enough to get the ackie. The tank dimensions will be (L x H x W) 4' x 3' x 2 or 3' (still on the fence about the width). It's a bit bigger than recommended for a single monitor, but hey, maybe I'll get two. If not, no problem. Lots of room to grow big and strong.
I've already done a couple preliminary sketches for the overall construction plan, which I will post in a bit. I guess those three years of architectural technology are paying off!

Second bit of new; after much head-scratching and the purchase of a tube of aquarium silicone, which I will be saving for my ackie tank, I've realized that the solution to the wire problem with my plastic plants is simple. Hot glue gun. It dries hard and so shouldn't be a problem, as long as I let it cure properly. Thanks for the advice, mom.

Thirdly, and this one is unfolding presently, I'm getting a Leopard Gecko.
"But Zach, why not save the cash for the awesome ackie?". True, very true. I would totally agree, if I were paying anything at all.
A friend of my mom is giving it away because her daughter left for Vancouver and couldn't bring it along.
It's seven years old, really well behaved, and it comes with all the fixin's. In truth, I wanted to do a bit more research into leos and get a proper space set up, but some people aren't good at handling the "pushy saleswoman" type. Long story short, I'm getting the gecko today.
Already, I'm making plans to change up it's habitat. I'm told it uses a heating rock, which have been know to malfunction and fry lizards. I'll be changing it up for an under-tank heater. Also, I plan on changing the substrate to something more friendly, assuming it's something like Calci-sand, which I have recently learned to be a pretty dangerous product.
I'm thinking of a name like Lokar. It sounds interesting.

Pics to follow.

Friday, April 13, 2012

Research into Custom Natural Habitats 1: Plants

Ever since I started looking into crested gecko care on YouTube, I've noticed how nice natural habitats are, even when compared to high quality of the plant products by Exo-Terra and ZooMed. The look of real plants, growing as they see fit, makes for an esthetic quality that far surpasses that of the sterile setup. However, a natural habitat raises the difficulty level of keeping your habitat healthy and functional, as you now have your flora to care for as well as your fauna. The benefits aren't lost on me either; natural plants help keep a good humidity level and increase air quality.
I've recently started looking into crafting my own habitat in the hopes of creating a truly unique terrarium that will make Rocza feel more at home and that will add a nice touch of decor to my own environment.

***

Part 1: Plant Life

Even though I'm really excited to try my hand at foam sculpting and building, I decided to start by looking what will probably be the trickiest part of the project: the plant life. There are lots of forums and sites that talk about which plants make nice additions to a cresty's habitat, but it's never as simple as just picking out what looks good. I have to take into account what kind of lighting they need, weather or not they require special nutrients, and above all, if it's a good choice for an actively arboreal species of reptile.

To start off, I'm compiling a list of plants that other people recommend for crested geckos. Thus far, this is what I've got:

Pothos: I've noticed that both the golden and jade pothos plants are very appealing, broad of leaf, and look like a plant that could easily hang down from on high.
Jade Pothos
image from:http://www.sanfranciscoplantcompany.com/plants1.html

Golden Pothos
image from:http://www.sanfranciscoplantcompany.com/plants1.html


Sansevieria: I have a larger one of these in my house presently. It's a very nice colour, very sturdy leaf, and it grows in an extremely vertical fashion. It's also layered which could give my gecko a lot of shelter.
Sansevieria Black Coral (Black Coral Snake Plant or Mother-in-Law Tongue)
image from:http://realornamentals.com/plant-store/small-black-coral-snake-ornamental-plant.html
Amaranthus Tricolour: This plant is more for decoration that function, as it boasts really vibrant reds and yellows. Some other species of Amaranthus have leaves of red and green.

Amaranthus Tricolour (Joseph's Coat)
image from:http://store.underwoodgardens.com/Josephs-Coat-Amaranth-Amaranthus-tricolor/productinfo/F1004/
Ficus: A very leafy plant that also resembles the plants found in crested gecko natural habitat. It's thin branches and shoots are non-the-less capable of supporting the weight of an adventuring gecko.
Ficus Elastica (Rubber Fig)
image from:http://www.flowersbylana.com/everydayflowersplants.html
Ficus Benjamina (Weeping Fig)
image from:http://www.dreamstime.com/stock-photos-weeping-fig-ficus-benjamina-in-pot-image18877453
Bromeliad: A very esthetically pleasing tropical plant, bromeliads form natural hideouts for little animals. Some can even form small "ponds" in the cup-shaped center of their leaves.

Blushing Bromeliad
image from:http://www.dkimages.com/discover/Home/Plants/Ornamental-Groups/Bromeliads/Neoregelia/Neoregelia-carolinae-Tricolor/Neoregelia-carolinae-Tri-2.html
These are just the most common suggestions. From what I can tell, any plant that provides shelter, can support the weight of an adult gecko, and isn't outwardly poisonous, is a viable option.
I'd also love to find ways of having real mosses in the habitat. They always add a really beautiful touch of green to any environment.

However, after a bit of initial research, I can already start ticking off certain species due to light requirements. According to the San Francisco Plant Company (from which I pulled a couple of the above pics), ficus need a lot of sunlight, which wouldn't be a problem if I was still using my UV blub. My decision to stop using the UV bulb came after talking with Emily of Pet Depot, who informed me that crested geckos can actually get sunburned. On top of that, they don't have eyelids, and I can imagine that a daily dose of UV light might cause some eye damage after extended exposure.
The amaranthus tricolour is another plant that needs a good amount of direct sunlight, so it can probably be forgotten in my case. The most my plants will be getting is a small amount of early morning direct light, but mostly they'll have indirect light, provided from my shuddered southward-facing window.\
The other plants seem to be well suited to indoor life, particularly the sansevieria, to which I can attest is a very hardy plant, capable of surviving much abuse and neglect. Even the bromeliads, some of which are really colourful, can thrive in interior conditions.

Being that I've only dipped my toe in the pond on the topic of indoor plant care, I've still got a lot to learn about plant nutrition. Again, personally, I can attest that the sansevieria is hardy enough to get by jsut fine with it's occasional watering. Then again, it was originally planted in fertilized soil, something I will really have to look into to ensure I don't end up poisoning my gecko. In any event, Crested Gecko Canada gives an idea of how I could use fertilizers or special nutrients without worrying. According to them, a bit of mesh under a layer of substrate should be enough to keep the gecko out of contact with treated soil. Still, I really want to look into organic options to feed my plants, just to be safe. I also had the idea of double potting my plants so I could remove them easily if I ever needed to give them some special care or feeding. It might interfere with the natural look of the enclosure though, but it's still an idea I had. Much more research is required on this matter.

Now, I decide to think about weather or not these plants are the right fit for my crested gecko. Luckily, since these plants were presented to me by crested gecko care forums and websites, I'm fairly confident that they fit the bill. But the reasons for that vary by plant. The pothos and the ficus have big flat leaves, perfect for a timid little gecko to hide under or to climb on. The pothos in particular interests me as I think I'll be able to plant it in a high corner and have it hang down as a good vertical access. Of course, I could always string it along something like my Exo-Terra Jungle Vine, which would make it work as a horizontal means of travel too. The sansevieria is also another means of vertical access as well as a refuge. Another refuge plant could be the bromeliad, with its long, broad leaves forming a safe little cup for something like a gecko to sleep in or draw water from. And the moss I'd like to grow would make a terrific moist bedding for any reptile or amphibian. The joseph's coat also gives nice refuge in its big leaves, which would make a great bed for my gecko, if it weren't for the light requirements.

Now, this is just the begging of my horticultural research, and as such, I hope to find new species of plants to add to my list, as well as ascertain for sure weather or not the ones I've crossed out can or can't be used.
Also, let's not leave out the idea of using some of Exo-Terra's Smart Plants or some of ZooMed's more colourfully decorative synthetic plants, either. After all, they'd be a constant source of "foliage" in a habitat that could easily fall short of expectations. After all, there's no certainty when it comes to me keeping live plants.

Tuesday, April 10, 2012

Product Review 3: Terrarium by Exo-Terra

As promised, I'm tossing up a product review today. After my last two product reviews, I realized I was waiting to get new products in order to write reviews when I should also be reviewing the products I've already got. Kind of a dumb moment on my part. So today, I'm reviewing one of the most important aspects of the habitat: the terrarium, and for anyone who's read this blog before, you know exactly which product that is.
***


Product Review 3: Terrarium by Exo-Terra

For this review, I'm doing more of a generalization of all Exo-Terra terrariums based solely on my mini-sized terrarium. Since most of the features I'll be noting are available on all models, I think this will be fine. Obviously, my critiques will not be size-based (because, hey... size doesn't matter).

Overall Rating: 9/10


Pros:
Great front and top access, particularly because of the two door system, which makes it so you don't have to open the entire front of your habitat. The accesses secure nicely, making escape pretty much impossible.
Good ventilation from both the front grill and top screen, the later of which is a pretty strong mesh, making it tougher than screen lids I've used in the past.
The little details that really make this a great product are ones you might not even use or even realize exist. The bottom is kept just off the ground, giving sufficient room to pass cables for any under-mounted heating pads or to slide in light stand footings, like I do. The top's wire and cable inlets are really handy, and even have a sliding blocker to close off the unused inlets.
Also, probably one of the most prominent features, it works very well with the other Exo-Terra brand products, as well as those by other companies.


Cons:
Not many, and I really had to dig deep to stop myself giving this product a 10, but the top lid can be temperamental to put back on. When you have an arboreal critter that likes to bolt by climbing even higher up, this can get messy. It's especially tough when you have tubes, like the ones used in the Monsoon system, tucked away up top.
Also, being that there are two doors, there's a small area in each front corner that often catches plants and other objects because of the way it opens.


Comments:

Just to clarify, the utility inlets are a great idea, it's just that they're fairly tight on water tubing. I worry that each time I try to squeeze them back in, I might pinch the cable and cause some really unwanted spraying to occur. I could fix this, but I would really have to cut into the background, since the tubing obviously can't be bent at a perfect 90 degree angle. Back before I had the Monsoon system, though, it was fine.

Images:
Well, pretty much all my images I host here feature the terrarium, but I'll toss in some newer ones showing off my newest fauna.


It just so happend that my Monsoon system went off as I was taking this shot.
I think I need to clean out a nozzle again, as it's kind of in Super Soaker mode.


Links:
Exo-Terra Terrarium - products page

*** 

 So that's it for today's review. I think that tomorrow I will review the cleaning product I use, firstly because it's an important product and also because I noticed someone visiting my site after trying a Google search on weather or not the product is safe to use with crested geckos. So, to that one  Googler out there, I will make a nod, as well an any possible future hobbyists who may want to expand their knowledge. 


Oh, on a personal note, tomorrow is an open house at my local college for people interested in the video game design and environmental technician courses. It's like fate, really, I swear. So, after that, I will write up another review, since I was away for pretty much a full moth.