Showing posts with label Zoo Med. Show all posts

Monday, January 14, 2013

Tropical Terrarium Build (part 2)

First, a little catching up after the holidays!

Regrettably, my moss project didn't go so well.  I think it was due to a poor mixture and lack of sufficient natural lighting.  I think I'll give it another try in the spring, after the melt, when the moss will be accessible.  This time, I'll give the beer recipe a try.  Or maybe even both yogurt and beer, for a comparative analysis.

I've also got a bunch of new pics to put up!  Lots of new things in both my leo's habitat and my tropical terrarium.  My leo's build has been completely upgraded, tank and all.  For Christmas, I got the Exo-Terra Medium Low terrarium; much nicer than an old aquarium!  I'll get into that on a different post.

For now, I'll showcase my tropical terrarium.

***


Behold, the final product of my tropical build!

It's not quite what I had envisioned, but I'm satisfied with it.  I was obviously hoping for a little moss in there, but I may yet be able to culture some and transplant it.  In the meanwhile, I bought some Zilla Premium Compressed Frog Moss to toss around  for a little extra splash of green.  I'm glad I didn't try to stick it down; it works much better just fluffed about.  The colour can be a little dominating if I put too much of it in one spot. 

Also note that my plants have been trimmed down and separated.  I mixed up my pothos a little, so I hope that they won't be in direct competition for root space.  The gold pothos (just visible on the right) is doing fine.  It's sprouted a couple new leaves in the time since it's planting, meaning that it is doing well.

I was having some trouble with the philodendron and sansevieria (snake plant), however.  When I put the Zoo-Med Hydroballs in, I oversaturated the soil.  This lead to me loosing a couple philodendron leaves and a sansevieria stalk to overwatering.  Still, being fairly hardy plants, they've totally bounced back.  The philodendron has also sprouted two new leaf, which are not visible in the above image.  Some of the individual pothos plants are withering off, but some have also sprouted new growths, kind of averaging it out.  The sansevieria is now my cresty's favourite resting spot.  He wedges himself between the leaves, almost completely concealed.  I wish he'd take advantage of the log hideout I built him, but I'm just glad he's enjoying the plants.

I've still got to install the Monsoon system from my old tank, although for now, my hand mister is doing fine.  As a side bar, I'll most likely be revisiting my review of the Monsoon system eventually, as I've had some issues with it since.  One of the tubes is also in need of a little patch job.  A drop or two of silicone should solve the issue.

In later pics, you'll see the substrate layers; drainage, mesh, and substrate layer.  The substrate is a combination of three Exo-Terra products: Exo-Terra Jungle Earth, Exo-Terra Tree Fern Substrate, and Exo-Terra Plantation Soil (brick format).  The mixture I used is as follows:
-2 parts plantation soil
-1 part tree fern substrate
-1 part forest soil
This gives me a really nice, fairly natural substrate that is both visually appealing and thus far totally functional.  Plenty of drainage and a good amount of water retention.

I've also added a couple extra pieces of wood, drift wood and grapewood.  I originally planned to use them for the leo tank, but once again, my eyes are bigger than the physical space of my tanks.  It's all worked out though, since they fit perfectly into the tropical tank.  They give even more jumping and climbing platforms, and help to break the line of sight.

The overall effect has been fairly noticeable.  Humidity has been stable at the 50 to 70 percent range, and temperature has been holding at 20 to 25°C.

Psycological effects have been noted as well.  Rocza's a little less intimidated by my presence, he eats more freely from my fingers, he's actually walked up to the glass and observed me, and he's gone as far as jumping at my fingers as I worked to place some wires around the outside of his tank.  I'm fairly sure it was the twiddling movements that set him off.  I placed my hand in right after and he recognized it at once, and tryed to lick Repashy off my fingers. 

But enough analysis, time for some more pictures!

The philodendron leaf on the left covers the feeding dish, giving the gecko a better
sense of security while he eats.  Having the dish on the door also simplifies cleaning.

Formerly, the newest leaf of the philodendron.


Jade pothos, now a little more worst for where.

Here, we see the pothos wrapped around the grapewood, as well as the log hideaway.  And Rocza, of course.


Next post, I'll show off the third phase of the leopard gecko build, talk about some new product I'm trying out, do a little research into yet another animal I'd like to acquire, and post plenty new pictures.  Hopefully, it won't be another month till then!

Wednesday, June 20, 2012

Research into Custom Natural Habitats 2: Backgrounds

A little late on my idea to post more findings for making the natural habitats but with studying for my chemistry refresher courses, the heat we've been having lately, as well fretting over tuition and grant money, it kind of got back-burnered.

Anyway, I found a really decent website for Do It Yourself naturalesque backgrounds called Bamboo Zoo, which links to several threads on Reptile Forums UK.
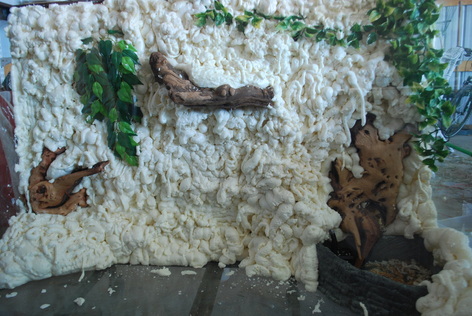
The setup I really liked was the Reptile Habitat in Foam by Hedy S., shown below. I've been trying to get a hold of some black spray foam from a guy at work, which is an idea I found on Youtube posted by bshmerlie which I will also post below. (Note to self, don't start Youtubing Skyrim soundtrack female covers!)
 What I like about Hedy's background is the way their mopani wood seems to grow out of the backdrop, something which I feel gives natural backgrounds some credibility. I also like how they added a couple synthetic plants as accents.

Image from BambooZoo
Now before I skip ahead to the part I like the most about Hedy's setup, here's the video posted by bshmerlie on how to create a spray foam background, hosted by Sherry. It's long, but very informative.

Just to note, I've been around to a couple places, even asked some of the contractors at work, and no one has even heard of black spray foam insulation in my part of town till just now. Not sure if this black Great Stuff is strictly an American product, but I certainly can't find it. Now what I like about Sherry's technique is how it stand up to wear and tear versus the generic white spray foam background. I think I might use a bit of a mix of black and clear acrylic, using the clear around the mopani wood to avoid black spots.

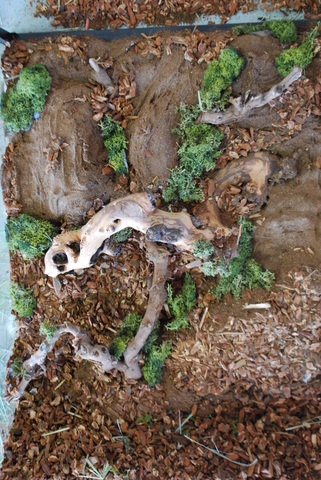
Now to get back to Hedy's setup, they use a mixture of substrates which really give it a natural feel. They even use a bark background, like the one Zoo Med but which I cannot seem to find on their product site.

The end result is this stunning piece of work.

Image from BambooZoo
What I really like is the mixture of the fine-grade Eco-Earth and larger Repti-Bark, both from Zoo Med.

I'd also really like to try to find a good way to grow moss on the mopani wood. Exo-Terra has the Tree-Fern Panels, but I'd like to know if they're in any way malleable once it's soaked. Also, I'd like to see if it actually does as advertised and grows small ferns and mosses.

So my shopping list is as stands:
-Spray foam insulation (preferably black)
-Aquarium-grade black silicone (I already have clear)
-Mopani wood (you can never have enough)
-Cork bark rounds (mix things up a bit)
-Plants
-Fine substrate (probably the bag format of Exo-Terra's plantation soil)
-Coarse substrate (some bark or coco husk)


And that's just for my cresty!
I'm planning a second upgrade for my leo already. He's very curious and loves to explore. unfortunately, all I have for him are aquariums which are more vertical than horizontal.
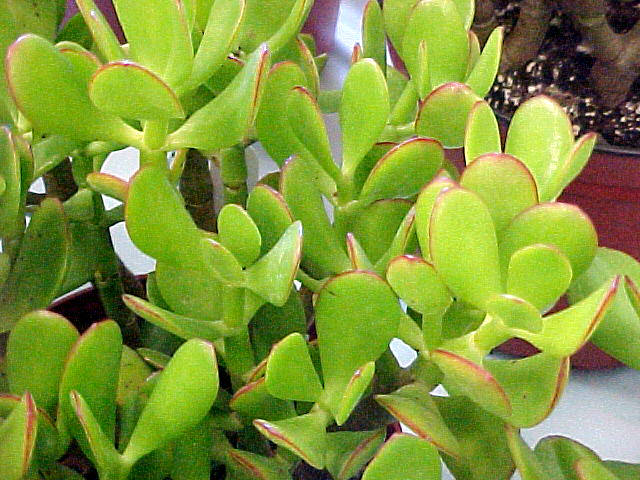
If I could get my hands on a nice-sized low and wide tank, I'd be happy. I'm also planning on introducing some greenery into his environment, like this Jade cactus.
Maybe some of my other synthetics as well, since it would be hard to keep his habitat dry like he needs it and still have nice plants. I'll work something out though. I'm also going to need some things for his hab.

-Sand (not as an actual substrate, but as a sub-substrate, jsut to hold the rocks off the tank bottom and stop crickets from hiding under them)
-Concrete grout (with which to cover my foam)
-Lizard-friendly sealant (to protect the grout)
-Large pebble substrate (to go over any sand that may be visible)


I have a lot to keep me busy, on top of all the things that currently keep me busy...

Sunday, May 20, 2012

Leopard Gecko Build (part 1)

Well, as I now have a part-time job at my old place of work (though somehow I managed to clock 39 hours last week...) and with the release of Diablo 3, I've been too busy to post. But no more! Well, as in, taking time today.

Right, so things I've been up to:
-Browsing hardware stores for tank decor material
-Searching for tropical plants
-Bargain hunting for new pet gear

I'll start with the pet gear. Just a side note really. I managed to score the Exo-Terra terrarium I've been wanting for cheap on a clearance sale at PetSmart. Down side is, I didn't pay for it as it is a Christmas present... But hey, progress.
I also snatched up some Zoo Med Eco Carpet in the tan colour for Bronka's hab. It's better than paper towel, I hope.

Now, for some tropical plant news. After much searching, I have to come to an obvious conclusion; I need to listen to people more. I've been looking through every garden center I can get to with little to no luck. Home Depot has some interesting, colourful plants, but not really the ones I want. people keep telling me to check the florist shop downtown, but I kept shrugging it off. I've been in there before, but never noticed anything very tropical. Long story short, they have some. They're getting some bromeliades in this week actually. I might just look into it. Though I'll probably just grow them in one of my empty tanks till I get my new one up and running so I can grow out any excess of fertilizers they may have.

Now, for the bigger news. I've found some decent products for building some rocky outcropping for Bronka at my local Home Depot. It's all fairly cheap too. So far.
Quick shopping list:
-Six-pack of rigid board insulation: 10.00$
-"No More Nails" adhesive: 8.00$
-Silicone Aquarium Sealant: 13.00$

I probably don't even need the silicone for this particular project, though I will need a water-resistant sealant to go over the grouting, though making  a water dish might be fun.

Now, some pictures!

Behold the colour-appropriate Eco Carpet by Zoo Me, as it is being explored for the first time by a curious Bronka.

"Dafugg is dis? Dafugg is dat? Dafugg are you?"

And finally, construction of the desert rock formation after day one.

 I'm building it in two general pieces to facilitate getting it in the tank, since it's the full length.
 It's admittedly wider than I had originally wanted but I fell it'll work out in the end.

I plan on squeezing my brown rock in front of this on a bed of sand to add stability and block out the access of crickets.
 I have a nice little hide carved out right over the under-mounted tank heater. This is obviously going to be Bronka's warm hide. I plan on either using his current hide as the moist hide on the opposite side of the tank.
It's not glued yet because I want to have a better idea of the final product before I start shooting glue everywhere.

And lastly, simple tools for a simple job: adhesive, sealant, metal straight edge, steak knife, and of course a Sharpie.


More pics to come as I progress.

Today's work was definitely a good learning experience. I learned that this is an uber messy project, as one can clearly see. I learned that doing this without a shirt on is a bad idea, unless you want to look like a polar bear afterwards. I learned plans are useless, but planning is essential.

I wonder what I'll learn next session.


Friday, April 13, 2012

Research into Custom Natural Habitats 1: Plants

Ever since I started looking into crested gecko care on YouTube, I've noticed how nice natural habitats are, even when compared to high quality of the plant products by Exo-Terra and ZooMed. The look of real plants, growing as they see fit, makes for an esthetic quality that far surpasses that of the sterile setup. However, a natural habitat raises the difficulty level of keeping your habitat healthy and functional, as you now have your flora to care for as well as your fauna. The benefits aren't lost on me either; natural plants help keep a good humidity level and increase air quality.
I've recently started looking into crafting my own habitat in the hopes of creating a truly unique terrarium that will make Rocza feel more at home and that will add a nice touch of decor to my own environment.

***

Part 1: Plant Life

Even though I'm really excited to try my hand at foam sculpting and building, I decided to start by looking what will probably be the trickiest part of the project: the plant life. There are lots of forums and sites that talk about which plants make nice additions to a cresty's habitat, but it's never as simple as just picking out what looks good. I have to take into account what kind of lighting they need, weather or not they require special nutrients, and above all, if it's a good choice for an actively arboreal species of reptile.

To start off, I'm compiling a list of plants that other people recommend for crested geckos. Thus far, this is what I've got:

Pothos: I've noticed that both the golden and jade pothos plants are very appealing, broad of leaf, and look like a plant that could easily hang down from on high.
Jade Pothos
image from:http://www.sanfranciscoplantcompany.com/plants1.html

Golden Pothos
image from:http://www.sanfranciscoplantcompany.com/plants1.html


Sansevieria: I have a larger one of these in my house presently. It's a very nice colour, very sturdy leaf, and it grows in an extremely vertical fashion. It's also layered which could give my gecko a lot of shelter.
Sansevieria Black Coral (Black Coral Snake Plant or Mother-in-Law Tongue)
image from:http://realornamentals.com/plant-store/small-black-coral-snake-ornamental-plant.html
Amaranthus Tricolour: This plant is more for decoration that function, as it boasts really vibrant reds and yellows. Some other species of Amaranthus have leaves of red and green.

Amaranthus Tricolour (Joseph's Coat)
image from:http://store.underwoodgardens.com/Josephs-Coat-Amaranth-Amaranthus-tricolor/productinfo/F1004/
Ficus: A very leafy plant that also resembles the plants found in crested gecko natural habitat. It's thin branches and shoots are non-the-less capable of supporting the weight of an adventuring gecko.
Ficus Elastica (Rubber Fig)
image from:http://www.flowersbylana.com/everydayflowersplants.html
Ficus Benjamina (Weeping Fig)
image from:http://www.dreamstime.com/stock-photos-weeping-fig-ficus-benjamina-in-pot-image18877453
Bromeliad: A very esthetically pleasing tropical plant, bromeliads form natural hideouts for little animals. Some can even form small "ponds" in the cup-shaped center of their leaves.

Blushing Bromeliad
image from:http://www.dkimages.com/discover/Home/Plants/Ornamental-Groups/Bromeliads/Neoregelia/Neoregelia-carolinae-Tricolor/Neoregelia-carolinae-Tri-2.html
These are just the most common suggestions. From what I can tell, any plant that provides shelter, can support the weight of an adult gecko, and isn't outwardly poisonous, is a viable option.
I'd also love to find ways of having real mosses in the habitat. They always add a really beautiful touch of green to any environment.

However, after a bit of initial research, I can already start ticking off certain species due to light requirements. According to the San Francisco Plant Company (from which I pulled a couple of the above pics), ficus need a lot of sunlight, which wouldn't be a problem if I was still using my UV blub. My decision to stop using the UV bulb came after talking with Emily of Pet Depot, who informed me that crested geckos can actually get sunburned. On top of that, they don't have eyelids, and I can imagine that a daily dose of UV light might cause some eye damage after extended exposure.
The amaranthus tricolour is another plant that needs a good amount of direct sunlight, so it can probably be forgotten in my case. The most my plants will be getting is a small amount of early morning direct light, but mostly they'll have indirect light, provided from my shuddered southward-facing window.\
The other plants seem to be well suited to indoor life, particularly the sansevieria, to which I can attest is a very hardy plant, capable of surviving much abuse and neglect. Even the bromeliads, some of which are really colourful, can thrive in interior conditions.

Being that I've only dipped my toe in the pond on the topic of indoor plant care, I've still got a lot to learn about plant nutrition. Again, personally, I can attest that the sansevieria is hardy enough to get by jsut fine with it's occasional watering. Then again, it was originally planted in fertilized soil, something I will really have to look into to ensure I don't end up poisoning my gecko. In any event, Crested Gecko Canada gives an idea of how I could use fertilizers or special nutrients without worrying. According to them, a bit of mesh under a layer of substrate should be enough to keep the gecko out of contact with treated soil. Still, I really want to look into organic options to feed my plants, just to be safe. I also had the idea of double potting my plants so I could remove them easily if I ever needed to give them some special care or feeding. It might interfere with the natural look of the enclosure though, but it's still an idea I had. Much more research is required on this matter.

Now, I decide to think about weather or not these plants are the right fit for my crested gecko. Luckily, since these plants were presented to me by crested gecko care forums and websites, I'm fairly confident that they fit the bill. But the reasons for that vary by plant. The pothos and the ficus have big flat leaves, perfect for a timid little gecko to hide under or to climb on. The pothos in particular interests me as I think I'll be able to plant it in a high corner and have it hang down as a good vertical access. Of course, I could always string it along something like my Exo-Terra Jungle Vine, which would make it work as a horizontal means of travel too. The sansevieria is also another means of vertical access as well as a refuge. Another refuge plant could be the bromeliad, with its long, broad leaves forming a safe little cup for something like a gecko to sleep in or draw water from. And the moss I'd like to grow would make a terrific moist bedding for any reptile or amphibian. The joseph's coat also gives nice refuge in its big leaves, which would make a great bed for my gecko, if it weren't for the light requirements.

Now, this is just the begging of my horticultural research, and as such, I hope to find new species of plants to add to my list, as well as ascertain for sure weather or not the ones I've crossed out can or can't be used.
Also, let's not leave out the idea of using some of Exo-Terra's Smart Plants or some of ZooMed's more colourfully decorative synthetic plants, either. After all, they'd be a constant source of "foliage" in a habitat that could easily fall short of expectations. After all, there's no certainty when it comes to me keeping live plants.

Wednesday, February 29, 2012

Product Research 1: Monsoon RS400 by Exo-Terra

Over the past couple days, I've really pondered on how many products I bought without knowing if they're truly necessary or if I should even be using them at all, such as the UV lamp and the calcium enriched Cricket Quencher. So I've decided to try doing a little more research into various products that I may one day purchase. For now, I'll just see what others have to say and weather or not I think this is a product I could use. If I decided to buy it later on, I'll definitely put it up to personal review.

***
Monsoon RS400 High Pressure Rainfall System
(Research Phase)

For my first product, I'm cheating a little. This is a product I've definitely already done some research on, but it won't hurt to gather up said research and list it here. It might just help someone.

Having tried my hand at keep my terrarium humid, I can definitely understand the need for something a little bigger than a hand mister, and so far, the Monsoon RS400 by Exo-Terra looks like a pretty stellar candidate, at least for my needs.

Check it out here in a video put up by PetSolutions on YouTube.


Why I need it:
-I need to make sure the substrate is moistened every day to ensure proper humidity levels, which in turn help with shedding and overall health.
-Geckos often drink their water off of leaves or even the tank walls, since this is most likely their natural behaviour, so daily mists are essential.
-Rainfall occurs on a fairly daily basis in tropical rainforest (you think?), and I'd like to try to emulate that as much as possible.

Why this product:
For one, this product is designed specifically for the tank I use, namely Exo-Terra's own brand of terrarium. The tube-work fits into the provided inlets along the top of the terrarium and the nozzles are held in place via suction cup. If you're the Handyman Hobbyist Herpetoculturalist, you can probably rig up something of your own design. I chose not to. At least, not at this stage of my "career".

The system is also pretty programmable, from what I've read, which is pretty neat. One could set it to spray off a couple seconds, twice a day.

You can also plug up to six nozzles into this system, which includes two right out of the box, so one could theoretically hook up two to three vivariums.

What compares to it:
After reading a couple chat rooms and watching some YouTube, I've noticed that in place of a direct mist system, some folks go with a fogging system, which might serve one better for various reasons. The reason I came across that seemed most sensible is pooling. If you don't have an absorbent substrate, you might want to consider a fogger.

I, for one, prefer the mister. It seems more like rain and it gives the whole terrarium a nice moistening, which would be great for an all-natural vivi. Not to knock the fogger though. Foggers totally add that "rainforest feel".

I cam across a couple humidifying options:
-The option that kind of seemed strange to me was the Ultrasonic 360 Humidifier from Safety 1st, which is actually used to humidify nurseries. Then again, if you have a big enough enclosure, or you keep the entire room at the right humidity level, this might work. But for me, this isn't even an option. I like my humidity to be direct and discrete.
- Foggers, as mentionned above, might be better for the person who wishes to avoid pooling or over-watering their enclosure. Both Exo-Terra and Zoo Med boast a fogging system in their respective catalogs. ExoT's fogger, however, is more of an add-on to their waterfall systems. Cute, but it could be kind of cumbersome to have an entire waterfall in your habitat just to add a little fog. On the other hand, Zoo Med's Repti Fogger doesn't really seem to have a decent way of incorporating into your vivarium. The kid I found on YouTube actually cut a hole in the screen top of his enclosure. Definitely not something I would consider. I think in this case, I would either simply place it on the screen and let the fog seep through the ever-so-permeable screen top, or rig up a funneling system to put on top of the tank.
In my opinion, both present very viable methods of humidification. It just depends on how much room you have to spare in your set-up.
-My personal favorite, the Monsoon RS400.
-My current option; using a small, hand-held spray bottle. It's cheap, it's simple, it works, but it's more labourious, less measured and so on and so forth.

Useful links and videos

Product links:
Exo-Terra's Monsoon RS400 Rainfall System
Exo-Terra's Fogger and Waterfall 
Zoo Med's Repti Fogger

Videos:

Monsoon RS 400 in action
Video put up by (name) on YouTube.


Here's an example of the Monsoon RS400 being used to mist a dart frog set-up. All frog-related cuteness asside, this is a really nice terrarium. It's also a great showcase for the rainfall system.

Repti Fogger setup and function
Video put up by (name) on YouTube.


This video is put up by HerpCare101. It's a kid named Steve showing off the system and how it works with his tree frog set-up. You can see what I mean about the system being hard to incorporate into your habitat without remodeling your lid.


Some other useful vid links include:
-A video from joshsfrogsvideos showing the installation of the Exo-Terra Monsoon (video)
-A link to the YouTube channel for HerpCare101. I haven't explored it much, but it seems like a great place to peruse. (channel)

Tuesday, February 7, 2012

Environment Test (take 2)

I'm putting this post off way too long, but damn it, I keep getting sided by updated manga and youtube videos. I've been meaning to do this since last night when I modified my setup, but figured it be more chronologically sensical to wait till the following day to rectify my doom-and-gloom post of yesterday. 

I think I finally have it. With the exception of some varying humidity readings, everything seems to jive. I have a hot zone temp of about 32°C (bugger off and learn metric, I hate converting lol), a cool zone of a little under 25°C, clear difference in temperature of about 2°C between the majority of the ground cover and the ground under the hide-away, and a humidity of 80% on the dot in the most humid zones.

What's different? This little bugger: the Zoo-Med Reptile Lamp Stand. This thing litterally saved my enclosure. I was originally looking for the Exo-Terra Light Bracket, but was unable to find this at my local PetSmart as well as one of the many in Ottawa. I was kind of crunched for time last night though and didn't really want to make an hour and twenty minute commute for nothing, so I asked around and one of the staff pointed me to Big Al's (seriously!). The stores full name is Big Al's Canada (just look for the big shark!), and I think I'll be putting their link in my list for future shopping needs. These guys specialize in fish, reptiles and ponds. No bird nonsense or kitten shenanigans here. I wish I ahd more than ten minutes to scope out the place, but closing time is closing time.

Anyway, grabbed this item without comparing much with what I'd seen of the Exo-Terra bracket, and I was a little scared on my way home. But lo and behold, it's a thing of beauty! Not that I can physically compare, but this looks to be the product to fit my need. It's taller, brings the light out further from it's stem, and even has it's own base so you don't have to mount it permanently to your tank. Now, mind you, I say this again, this product is better for my needs. For one thing, with the combination of light dome and canopy, the bracket would of had to of been mounted to the side; not a very esthetically pleasing prospect. Also, I plan on upgrading tank sizes by year end, so I don't really want to buy another, or rip it off the side or whatever.

However, there is a big "but" here, other than mine own; did some price checking. The Exo-Terra bracket falls in the price range of about 11.00$ to 15.00$. The Zoo Med stand runs you up around 45.00$.

So it's a question of apples and oranges really. They serve functions different enough for them to be considered completely different products (in my opinion) and should therefore not be compared (much like the Gene Wilder Willy Wonka and the Johnny Depp Willy Wonka).

To summarize, both the Zoo Med Lamp Stand and the Exo-Terra Light Bracket are viable options for ways to affix your light and better control the inner temperature of your enclosure and keep the light out of harms way, as depicted in the image below.

I should like to point out that the only two of the wires in that tangle are associated with the terrarium.
The rest are an unfortunate by product of technology in the living space.